Teacher User Guide
General Navigation
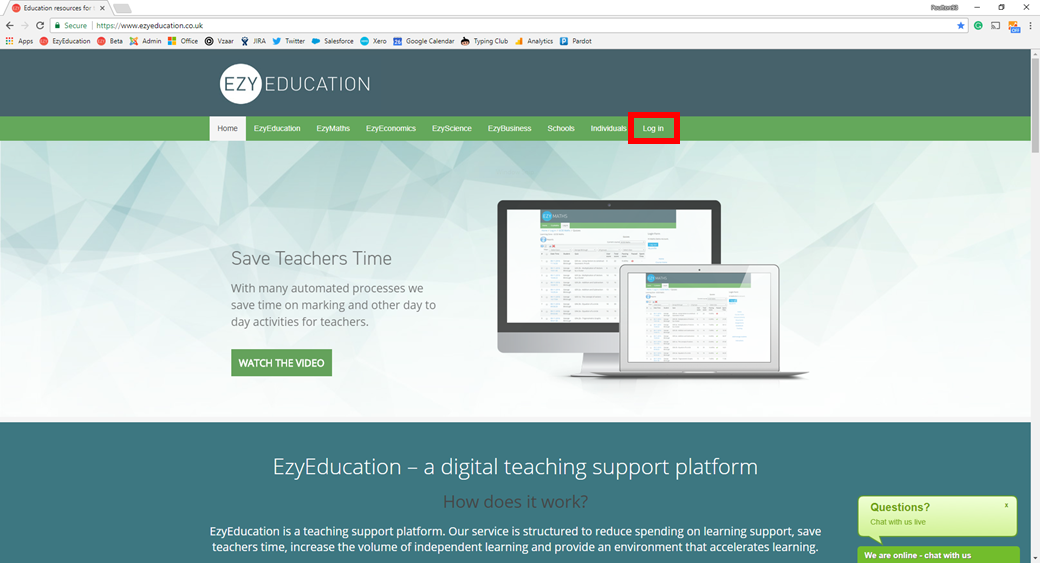
To access the learning zone from wherever you are on the site, use the Log in button in the top menu.
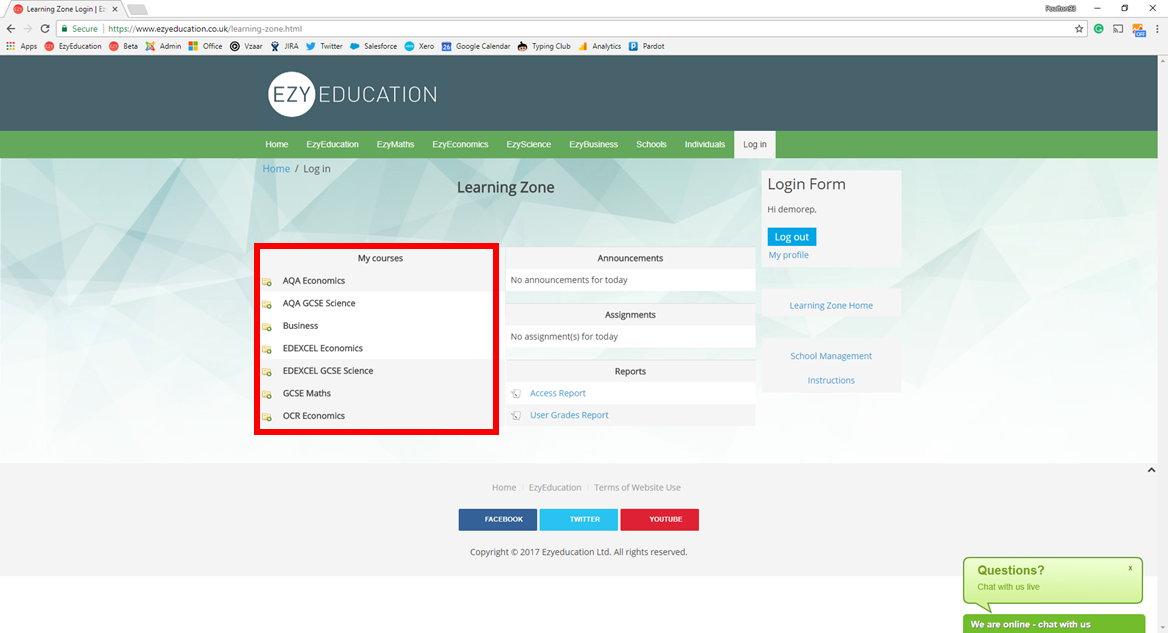
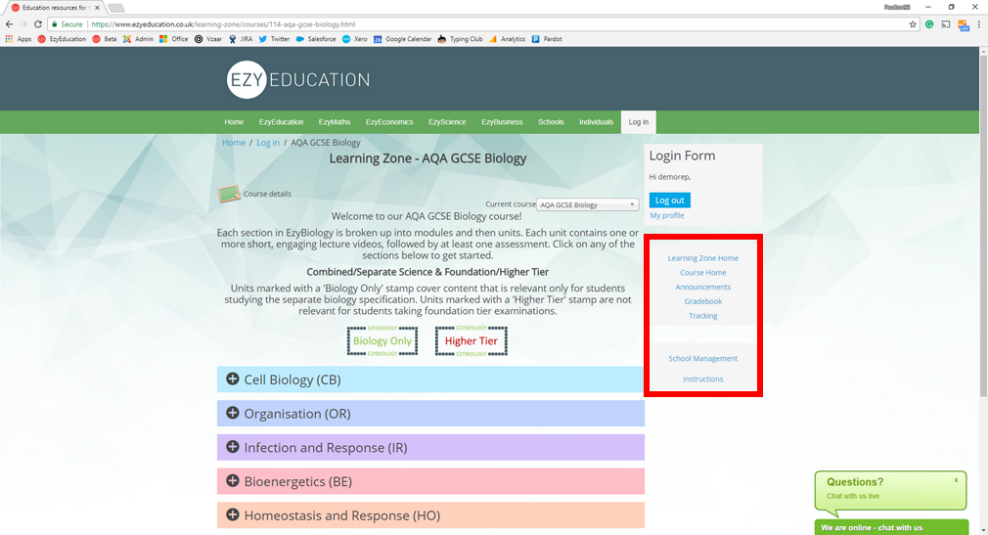
Once logged in, you will land on the learning zone home page. This allows you to navigate to any of the courses you have access to, using the links on the left-hand side.
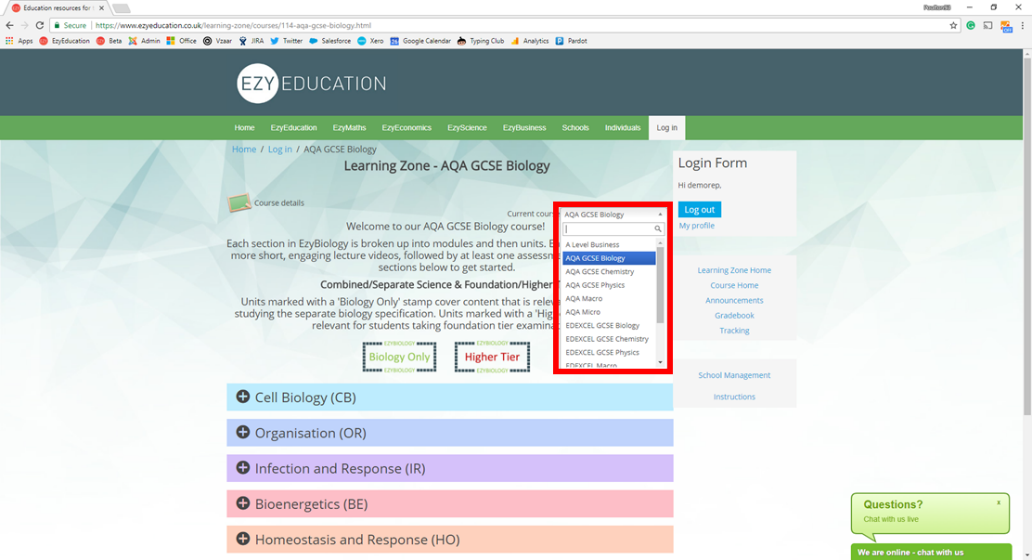
Once you have entered a course, the main portal is the course home page. There are three main navigation tools available:
1. You can quickly switch to another course by using the drop-down at the top of the page.
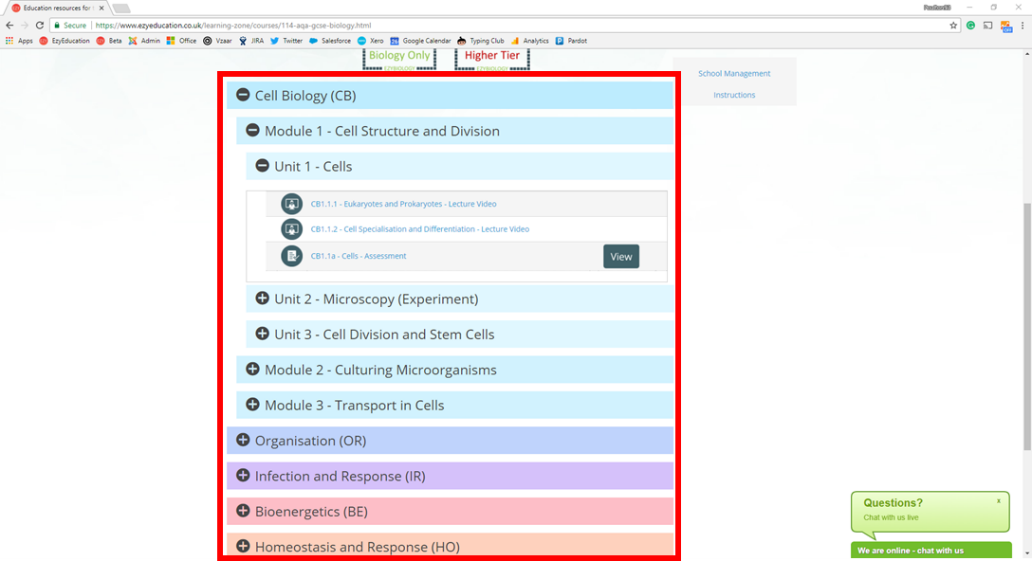
2. The multi-layer drop-downs allow you to dive into the resources.
3. The right-hand side menu provides access to other tools like Announcements, Gradebook, Tracking, and School Management (School Reps Only)
Please note that the resources in our courses (apart from EzyEconomics) are split into three tiers of division:
- Sections
- Modules
- Units
EzyEconomics currently is split into only two tiers:
- Modules
- Units
Lecture Videos
Our lecture videos are designed to cover all of the specification requirements of the topic. They are typically between 6 and 12 minutes long, although can be shorter or longer than this where appropriate. We recommend that your students use pen and paper, or their exercise book, to take notes as they watch a lecture video. This transforms the passive learning experience into an active experience.
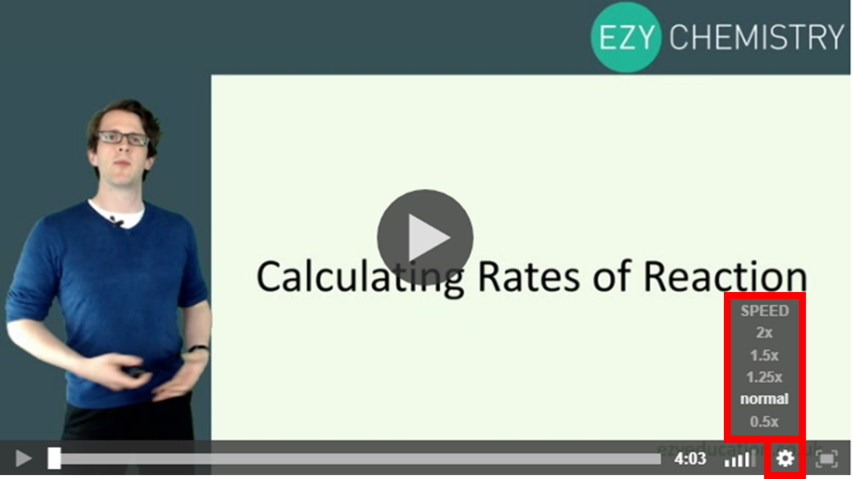
Users can stop the video and go back through parts that they didn’t quite comprehend first time. There is also the option to change the speed of the video, using the video player options.
Assessments
Our unit assessments are designed to help your students consolidate and reinforce their understanding of the topic. They will encounter a wide variety of question formats. Be aware that for many of the ‘tick-box’ style questions, they need to determine the accuracy of each option, as there may be more than one correct answer.
We highly recommend that your students have a pen and paper available when completing an assessment. Many questions will require workings.
Be aware that users have to wait 24 hours after they have completed an assessment, before they can attempt that assessment again. Students may, however, review their previous attempt and access the feedback during this time.
Whilst students are attempting an assessment, they can use the navigational bar at the top of the page to move ahead to other questions or review questions already answered.
After submitting an answer to a question, users will be taken to the feedback screen. At the top of the page is the outcome: whether you were correct, incorrect, or partially correct. Immediately underneath users will find the feedback. If they had any problems answering the question, we heartily recommend that they engage with the feedback. Educational research has shown that student performance increases significantly if students engage with explanatory feedback. Following this, users will find their answers and then the correct answers.
EzyEducation assessments are carefully structured so that engaging with the feedback provided will help with later questions in the assessments.
Here is an example of one of our feedback screens. The user clicks the ‘next’ button at the top or bottom to move on to the next question.

Student View
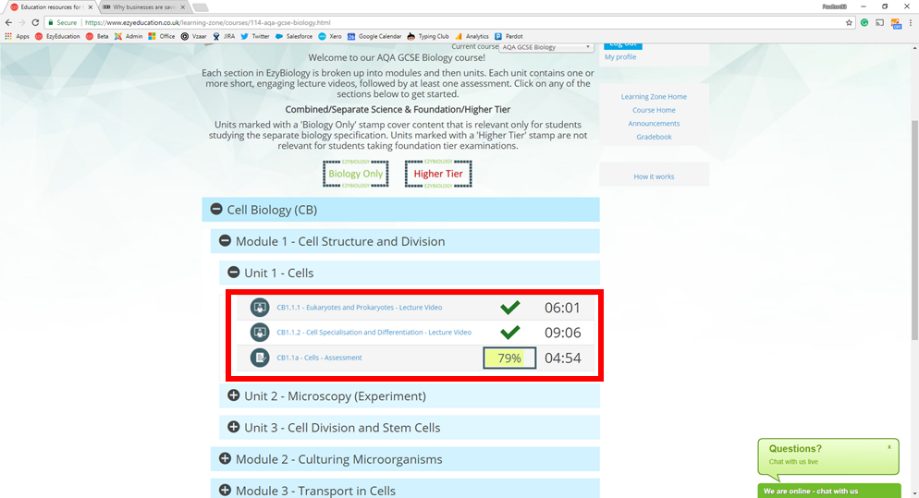
What your students see is very similar to your own view of the platform. Students should head into a course and then use the drop-downs to navigate to their desired resources. The drop-down bars for each topic will provide students with an indication of which lecture videos they have already watched, and their performance on assessments they have previously completed.
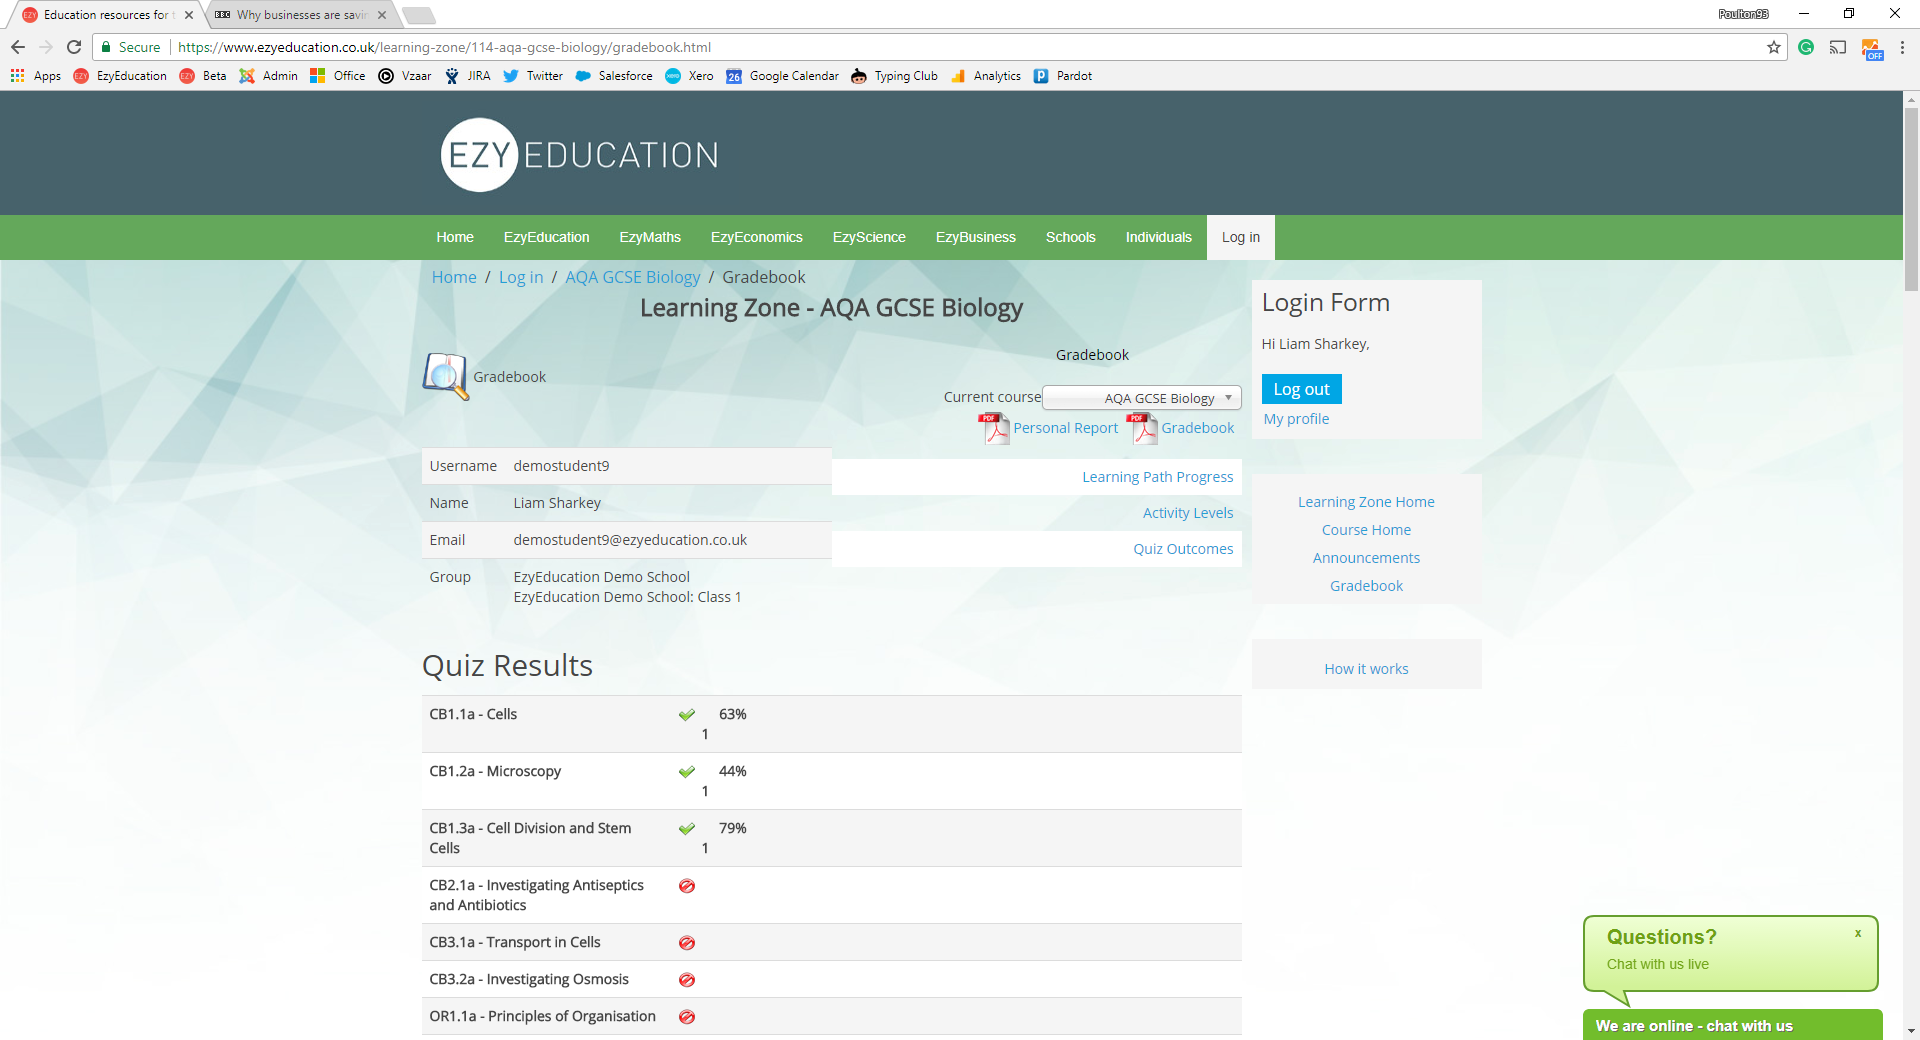
When within a course, students can use the right-hand side menu to access their own gradebook, providing them with access to all their assessment data. There are a variety of download options and links to other, more detailed, reports at the top of the gradebook.
Setting Work
Setting Work
We are currently working on developing our ‘assignment hub’ which we hope to release over the Christmas holidays. This will provide a clean, intuitive and easy to access way to set your students work directly on the platform. Students will be greeted with the assignments they have been set immediately after logging on and will be able to get started on the required work with a single click. You will be able to review progress data on a particular set of assignment via a single click. We are very excited about this development and cannot wait to share it with you!
Until then, there are various ways you may want to set your students work. Many of our active schools work with the platform by simply directing students to complete particular units of the course and asking them to note this down in their school diary/planner as they would an offline homework.
If you would like to work within the system, the best way to do this currently is to use the ‘Announcements’ functionality. After heading into a course, you can navigate to Announcements using the right-hand side menu. Use the ‘plus’ icon to add a new announcement.
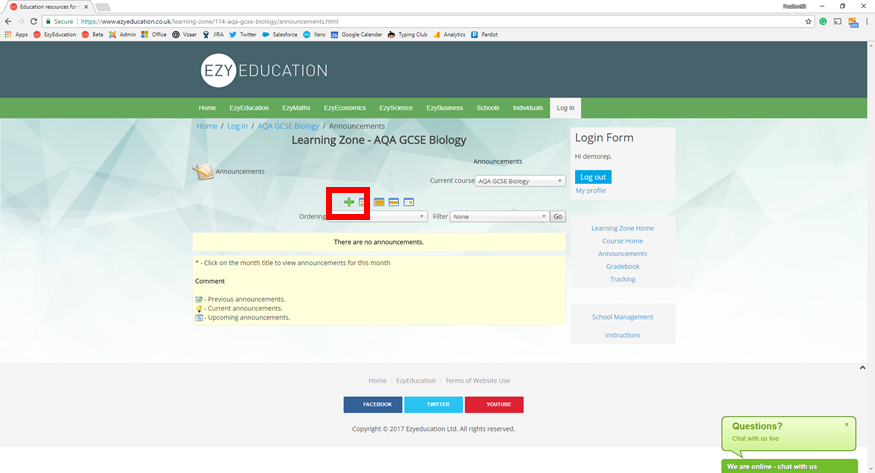
You can then determine the dates between which you would like the announcement to be visible, use the user groups filter to select particular classes you would like to restrict the announcement to, enter the title for the announcement and add the description.
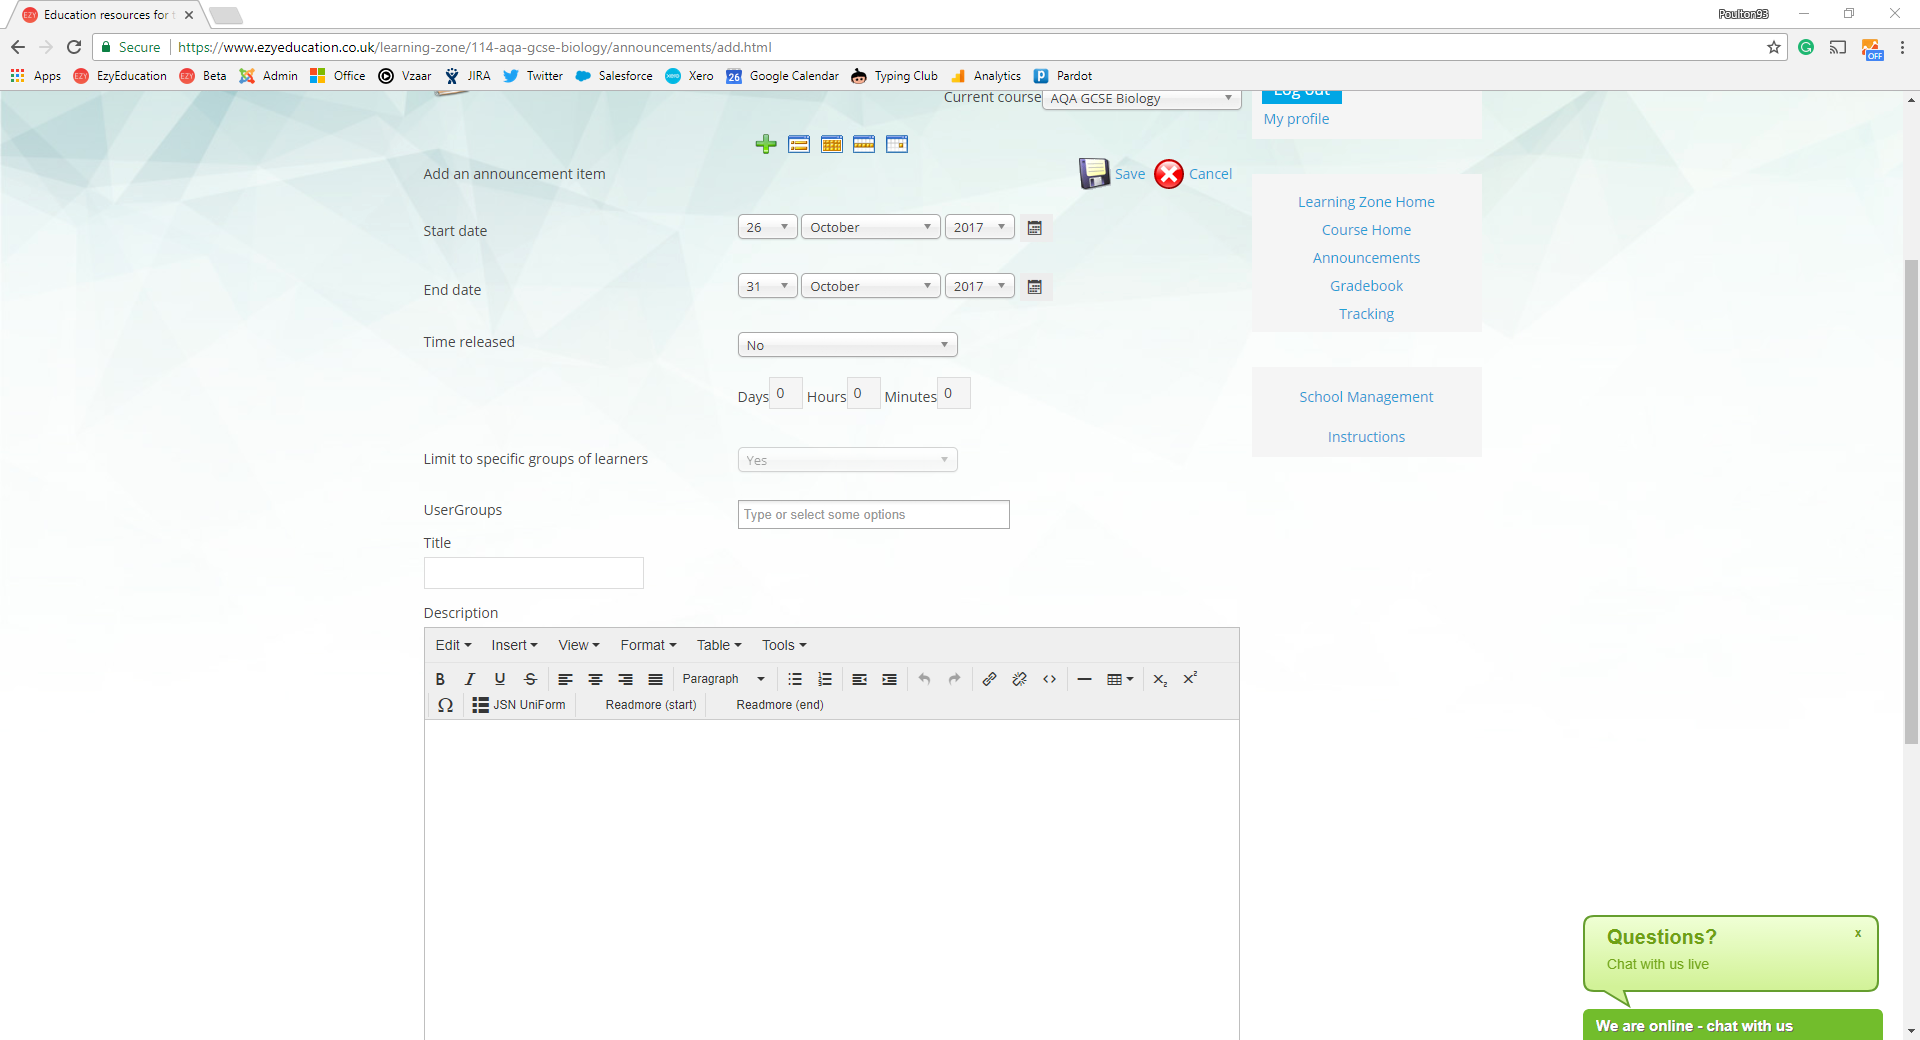
It is also possible to copy and paste the links to the resources you want the students to complete in the description box.
Linking to your VLE / Homework Software / SIMS
Linking to your VLE / Homework Software / SIMS
We appreciate that schools work with a wide variety of different whole-school software packages. We are looking at establishing technical integrations with many of the most popular packages. If you would like to set work on the EzyEducation platform from packages like Google Classroom, Show My Homework or your school’s VLE, the easiest way is to copy and paste the links to the videos/assessments you want to set as work.
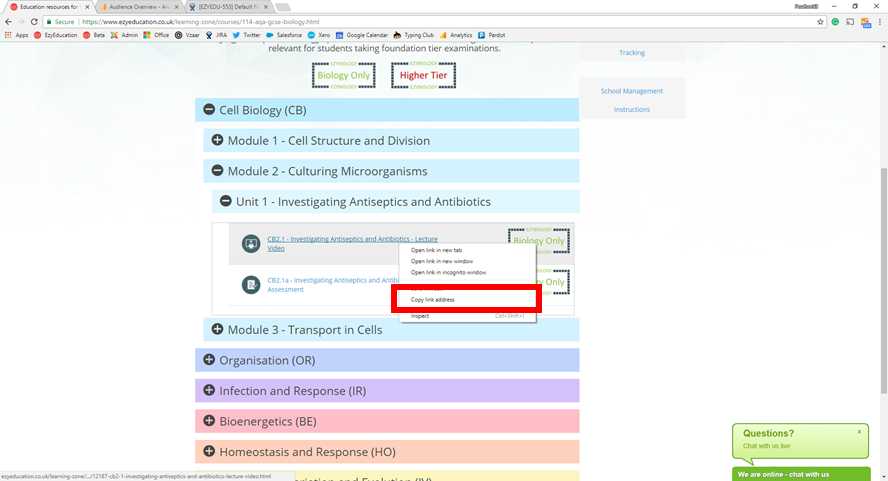
With regards to your SIMS packages, we are also looking into technical integrations with these. Current users have had success by using the gradebook download for their students and importing this data into their SIMS package.
School Management (School Reps Only)
School Management (School Reps Only)
School management can be accessed using the right-hand side menu. It’s where students and colleagues can be added and organised into classes. There are 4 tabs available at the top of the page: Students, Teachers, Class Management, and Archive. Please be aware that our school support team are able and very happy to help you set up or modify your students and class structures. Simply email over your students’ details and we can set them up very quickly!
On the Students tab, you can see a list of all the students added to the EzyEducation platform, with details of any classes they have been added to. You can select a user(s) using the checkboxes on the left-hand side and then either edit their details or archive them (remove them from your active students), using the buttons at the top of the screen.
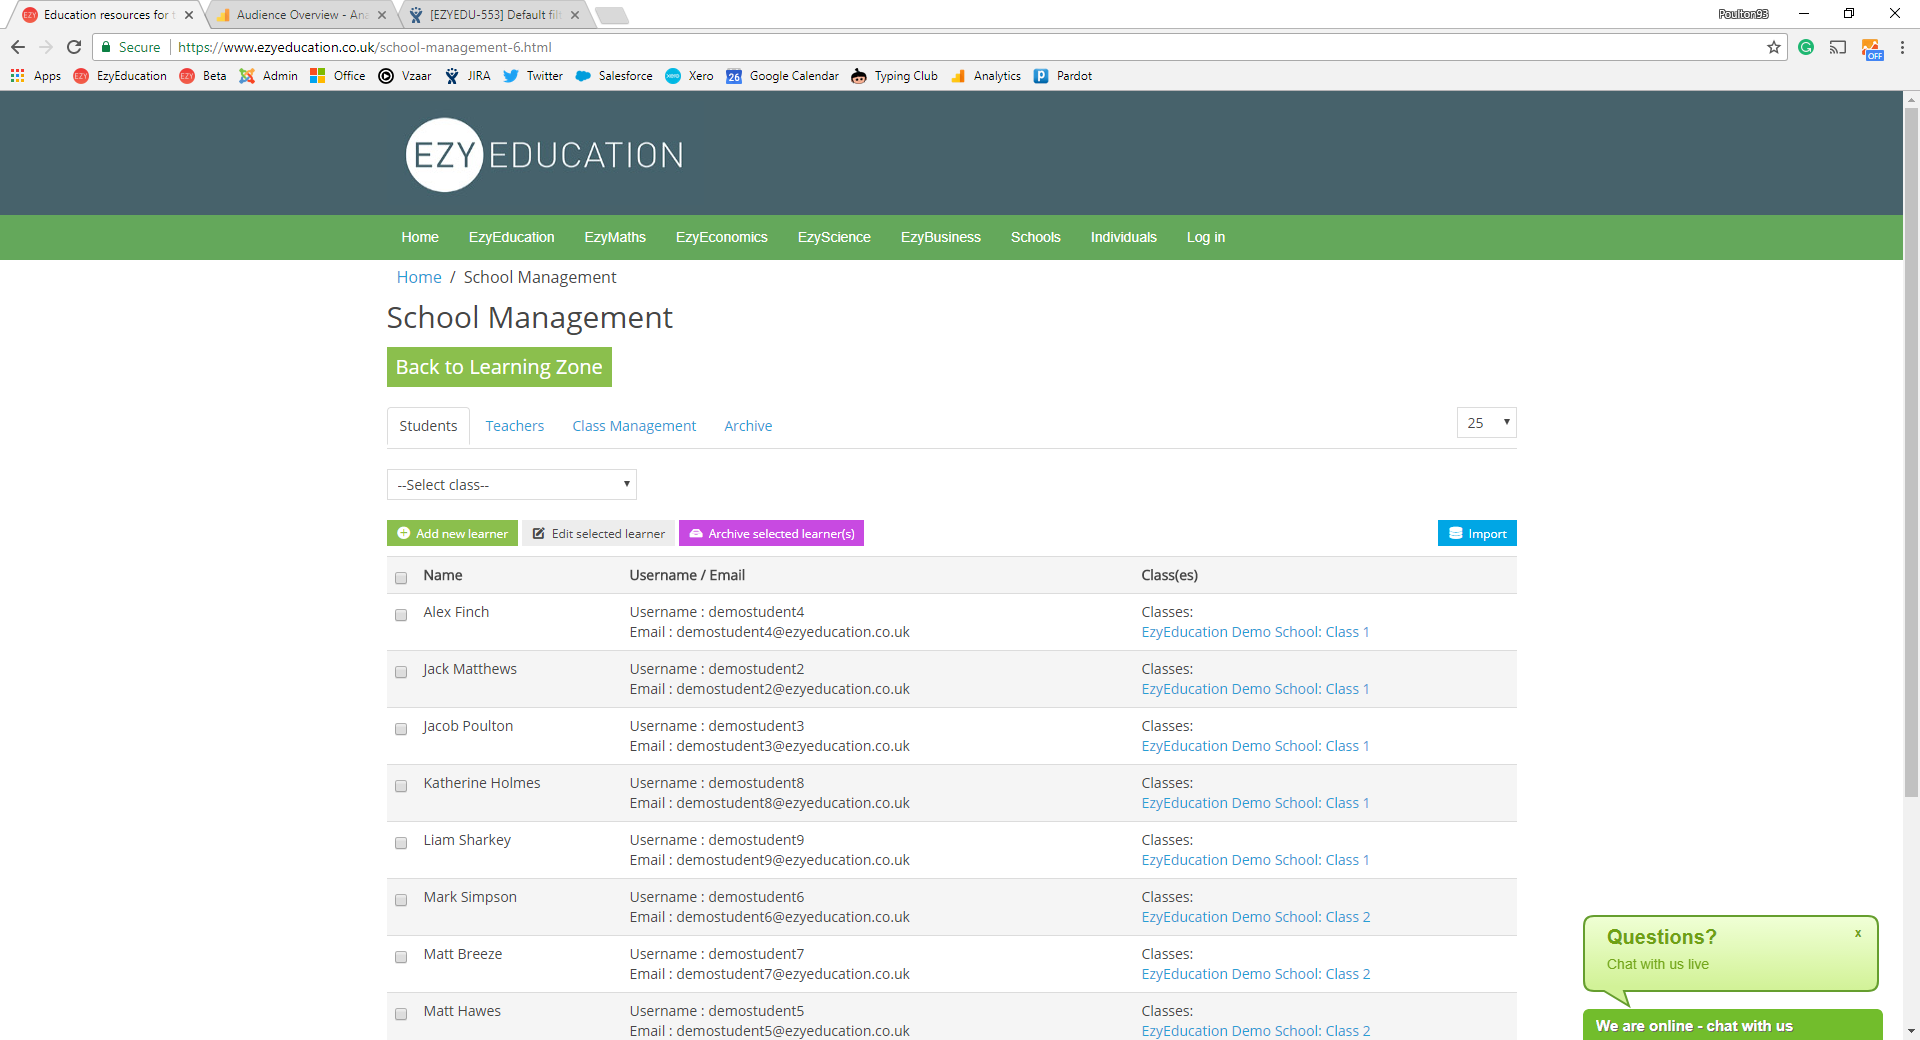
To add a small number of new students, you can add them individually by clicking the ‘Add new learner’ button at the top of the page. You will then be prompted to enter their name and their email address, before clicking save. For larger numbers of students, we recommend using the import option. See below for instructions on how to import.
It is a similar story on the Teachers tab. You will be presented a list of the teachers within your school group, and which classes they have been assigned to. You can use the ‘Add new teacher’ button to add teachers individually. When doing this, you will be prompted to enter their name, email address, and select which classes you want them to be assigned to. Again, if you are trying to add a significant number of teachers, we recommend doing this via the import option.
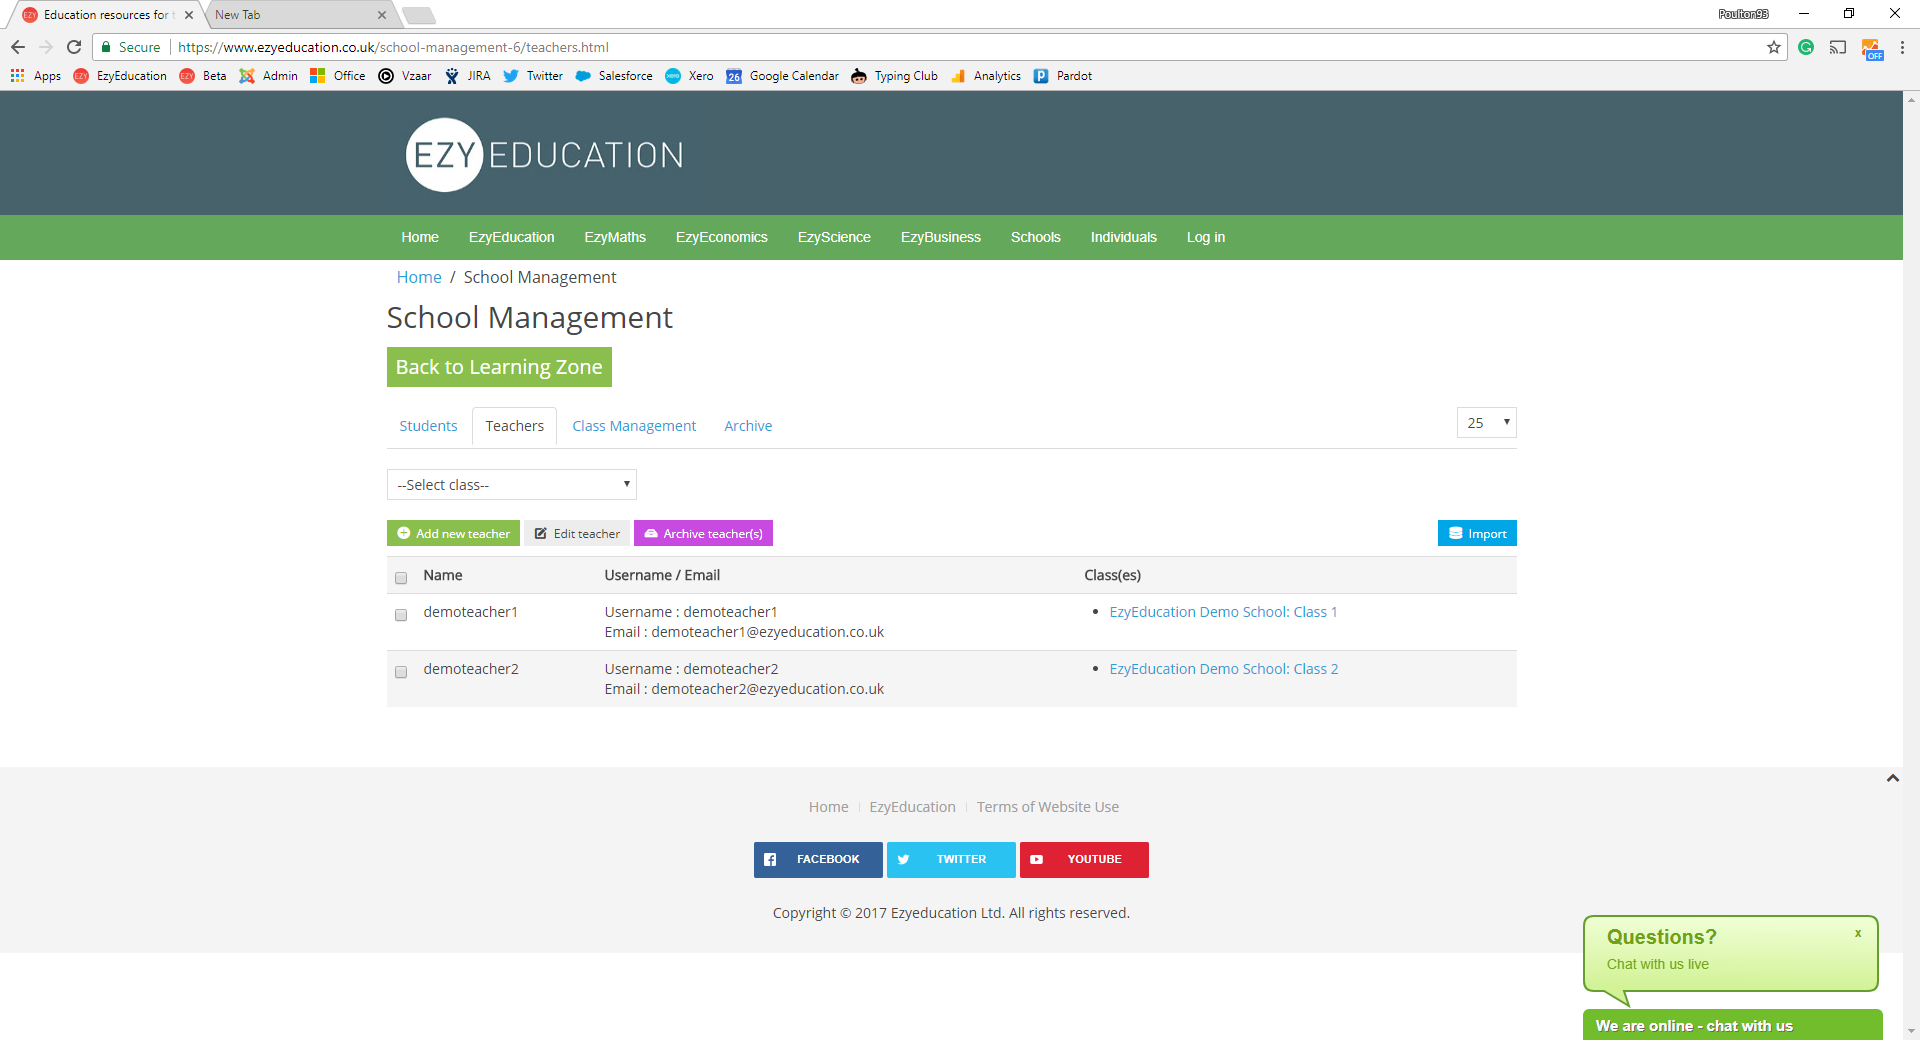
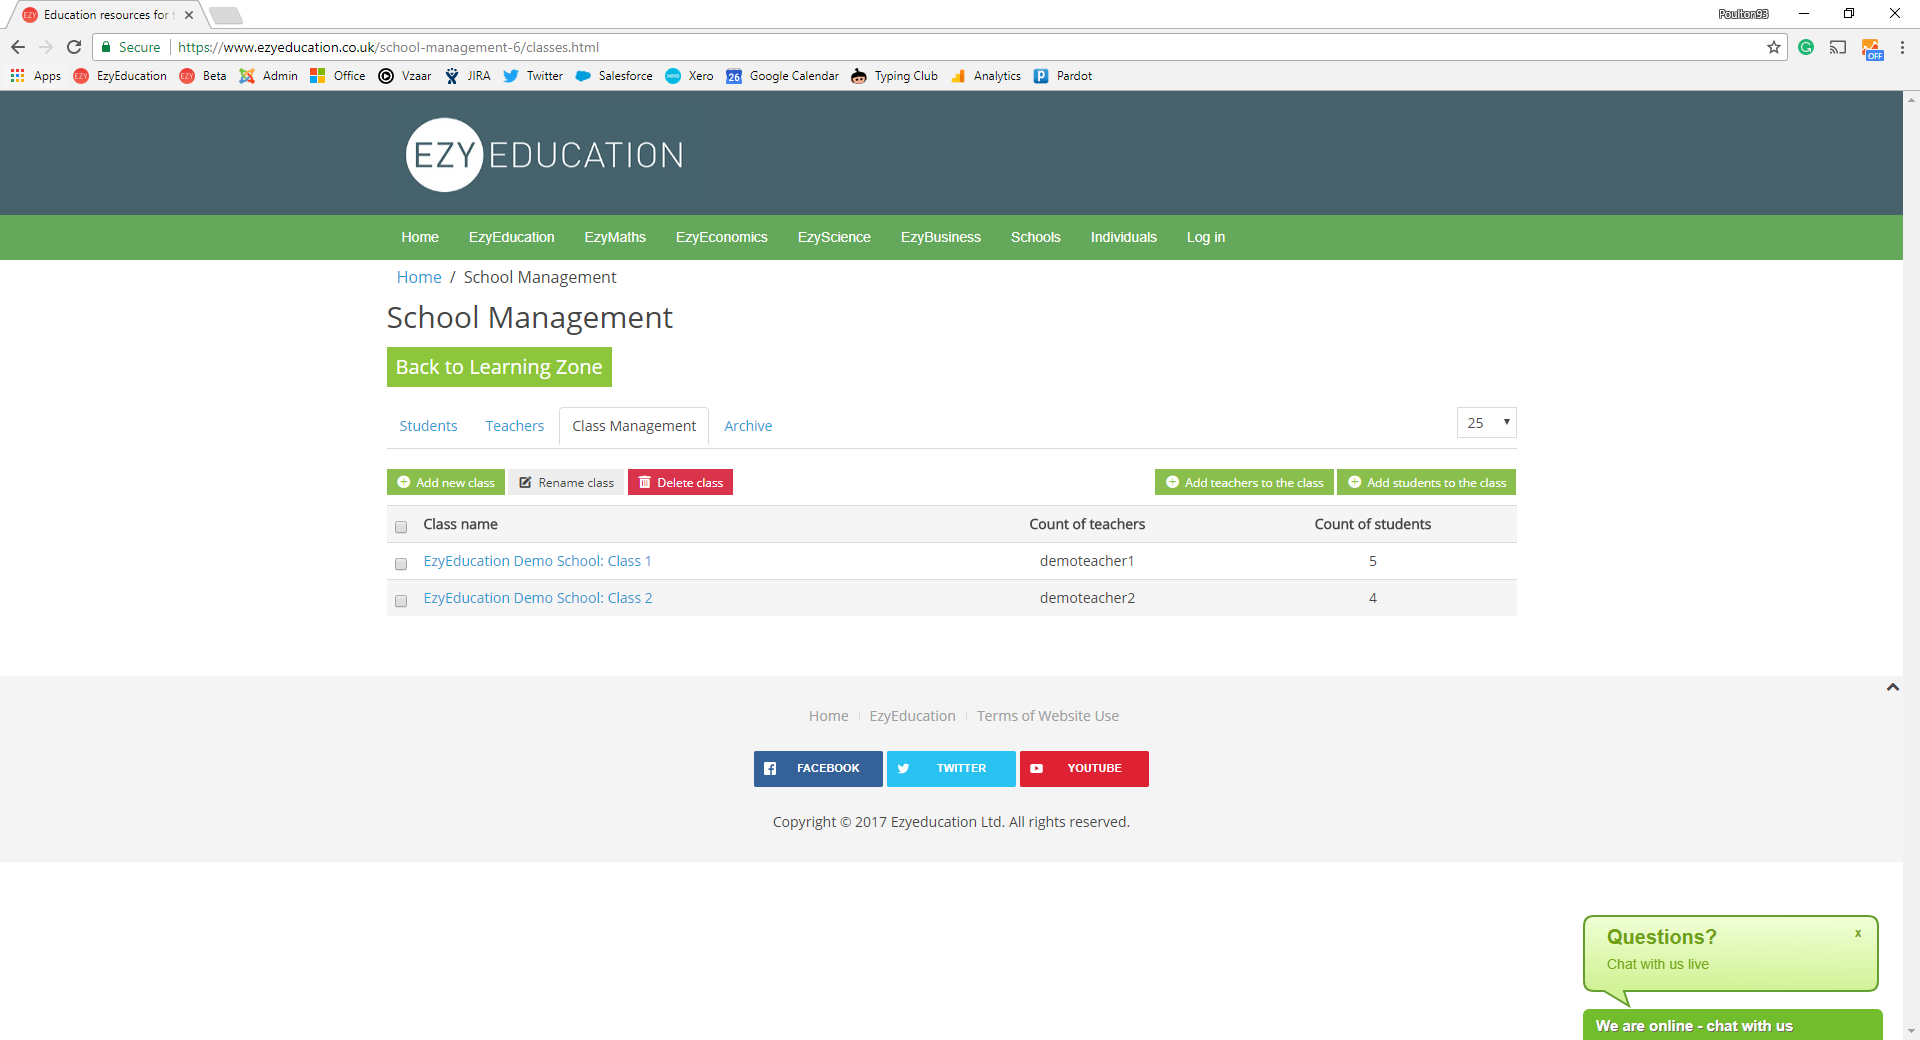
The Class Management tab lists all of the classes that have been set up. You can add new classes manually using the ‘Add new class’ button. Simply input the name and click ‘Save’. To add teachers or students to a class, select the class using the checkboxes on the left-hand side and then click the ‘Add teachers to the class’ or ‘Add students to the class’ buttons in the top-right corner. Classes can also be set up via the import option which assigns students and teachers to the correct classes at the same time.
The Archive tab provides a list of all the students and teachers who have been archived. These users will not show up in reports or filters. They can be unarchived by selecting using the checkboxes and clicking the ‘Unarchive user(s)’ button.
Mass Importing Students and Teachers
Mass Importing Students and Teachers
Please be aware that we can deal with the importing of your students and teachers for you if you email us with details (class lists with email addresses).
The first step to importing is to set up an excel spreadsheet with the details of the students and/or teachers you want to add. This spreadsheet needs to be set up exactly in the following way:

You should begin adding your users from row 2 onwards. Row 1 must be left for the titles as above.
Column A is for the names of the users.
Column B is for the email addresses. Every user must have a valid email address accurately inputted here.
Column C specifies what type of user each row is. Place a lower case ‘t’ for a teacher, and a lower case ‘s’ for a student.
Column D must contain the name of your school group, as it was spelt when it was created on the EzyEducation platform, in every row where there is a user.
Columns E onwards define the classes each individual user will be assigned to. The class name needs to be spelt the same for each user as differences in spelling will lead the platform to create separate classes. If the spelling of a class matches up with a class already created on the platform, the user will be added to that class. Users can be added to multiple classes, but there must not be a gap in the columns. For example, see row 2 below:

Other potential problems: please avoid including commas within cells, or ‘invisible spaces’ at the end of the input in a cell e.g. ‘Andrew Finch ‘.
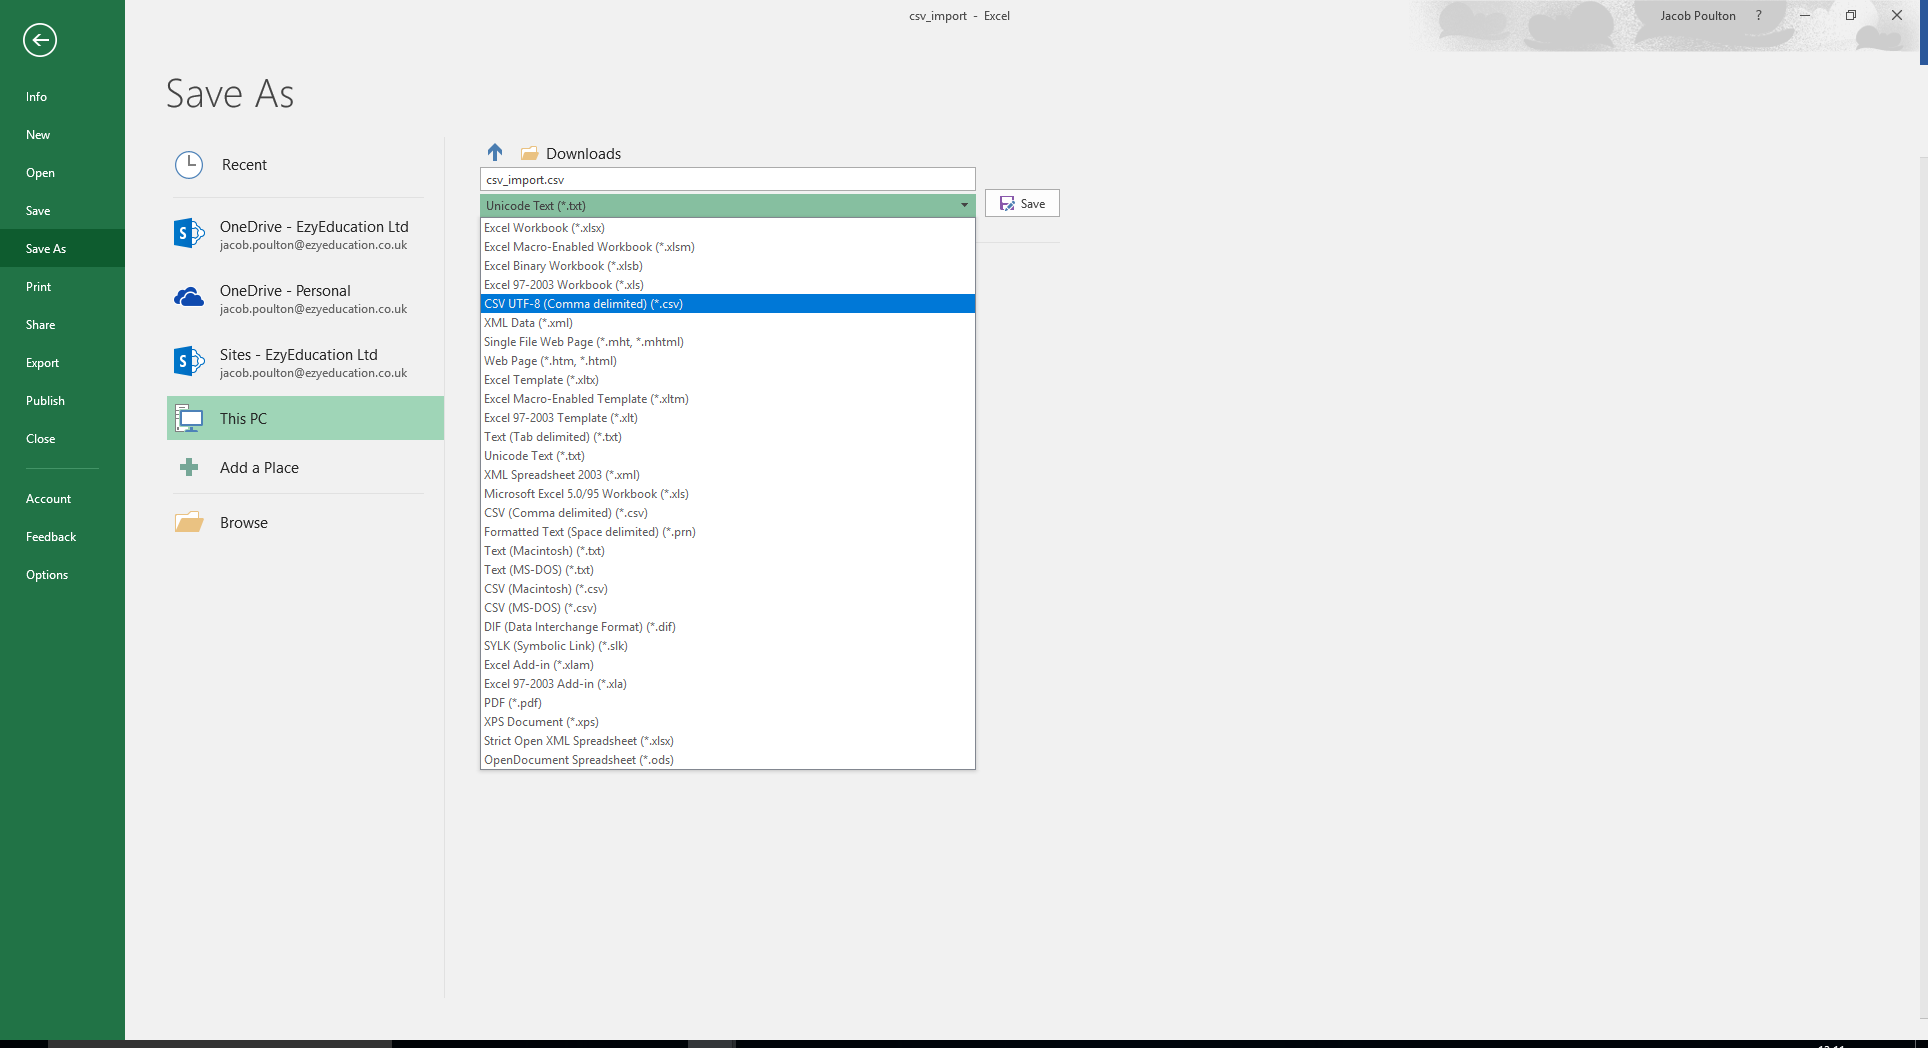
Once the spreadsheet has been set up, you need to save it as a csv file. Go to ‘Save as’ and then select as the file type ‘CSV UTF-8’, and save this onto your computer.
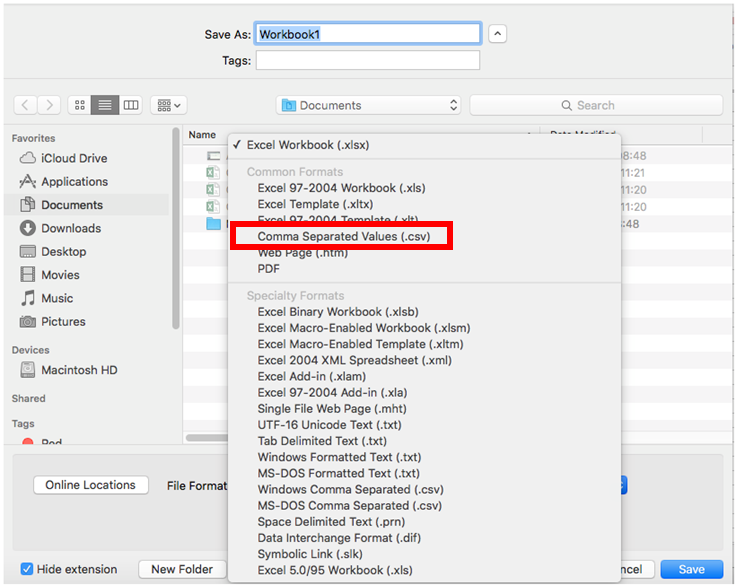
Or, if using a mac, use the ‘Comma Separated Values’ file type.
From within School Management, click the ‘Import’ button.
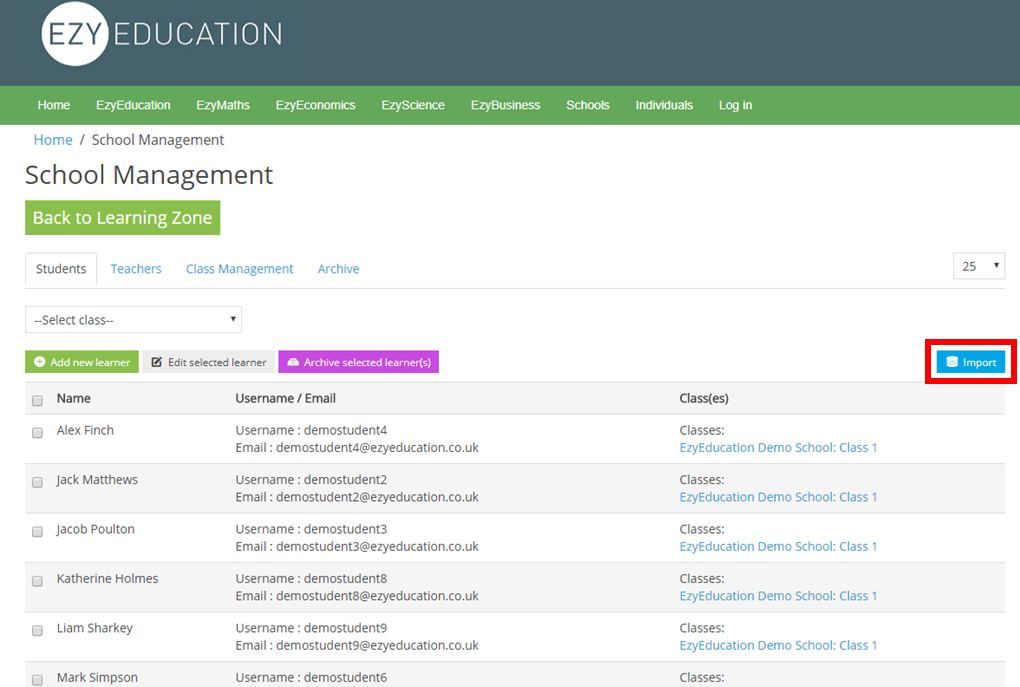
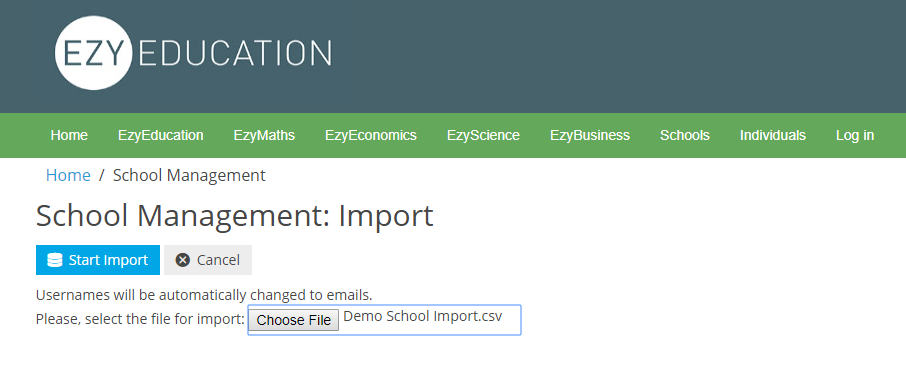
Use the ‘Choose File’ button to select the csv file you saved, and click ‘Start Import’.
Allow some time for the import to take place, then you should see a ‘success’ message like the below:
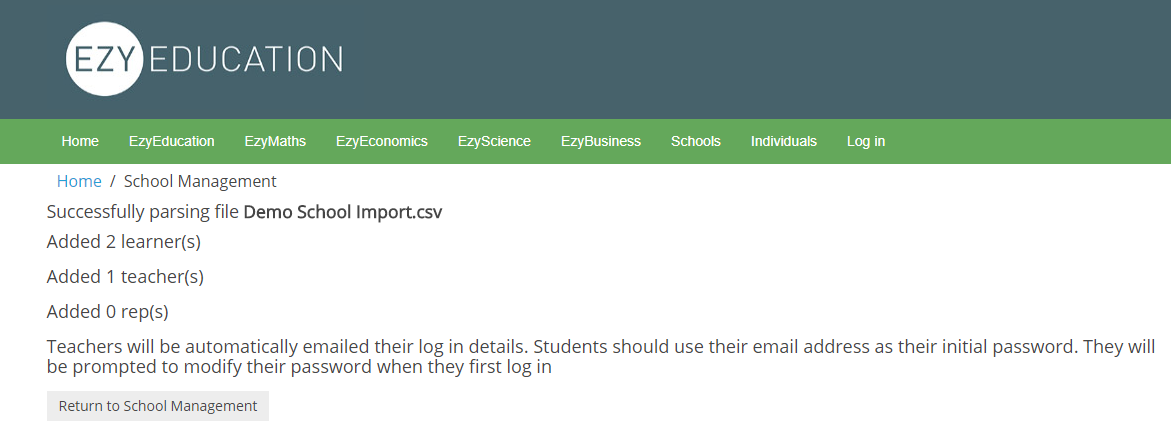
If you see an error message on this screen then it is likely that there was a mistake in the setting up of the spreadsheet. Please get in contact with us for some assistance.
Gradebook
Gradebook
If you have entered a course, you can use the right-hand side menu to access the gradebook. The gradebook presents you with the assessment data of your students. You can use the filters at the top to focus on a particular section of the course, or a particular class.
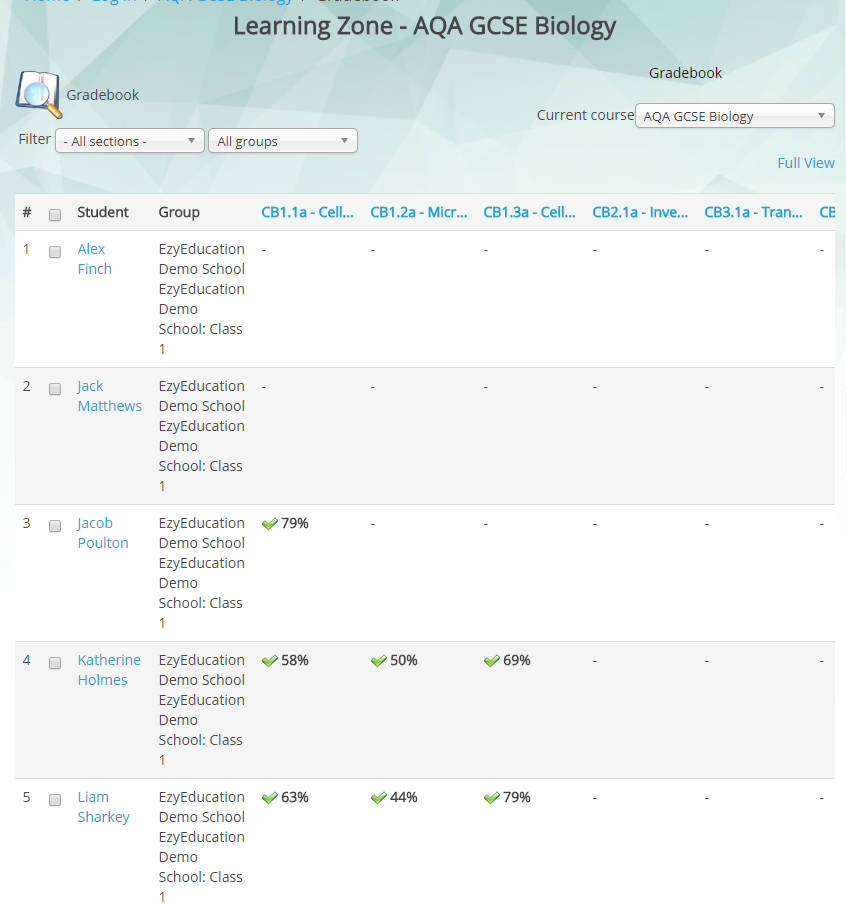
The best way of viewing the gradebook data is to download into a spreadsheet. The icons to achieve this are found at the bottom of the gradebook:
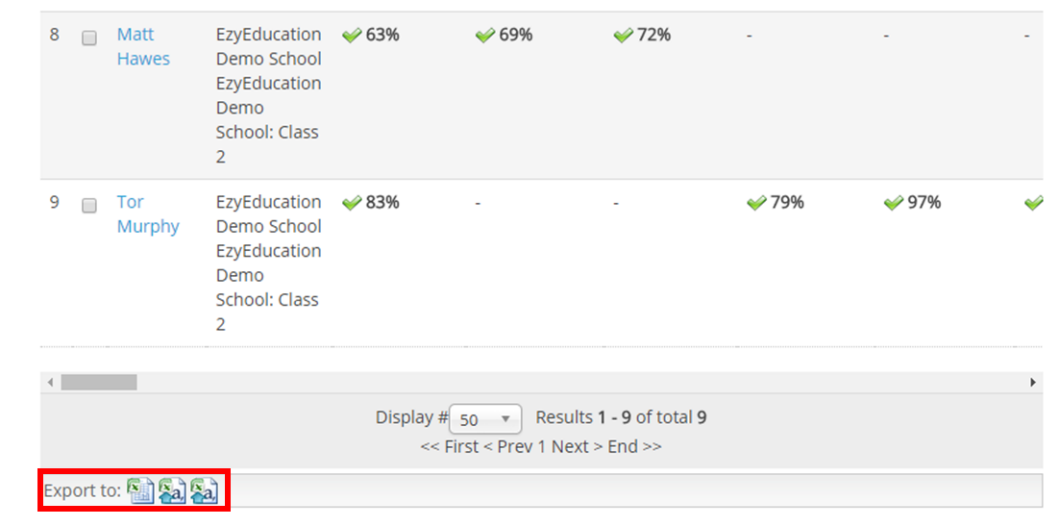
The first option (on the left) is ‘All Classes’. This provides a spreadsheet which shows the attainment data by listing the assessments down the rows and the students, arranged by class, along the columns.

The other icons require you to first select the students you want reports for, using the checkboxes to the left of their names. Clicking the icon for ‘Bulk Gradebooks’ or ‘Bulk Personal Reports’ will then provide you with a download of a zip file. Inside the zip file will be individual pdf reports for each of the selected students. This can be useful for handing out at Parents’ Evenings.

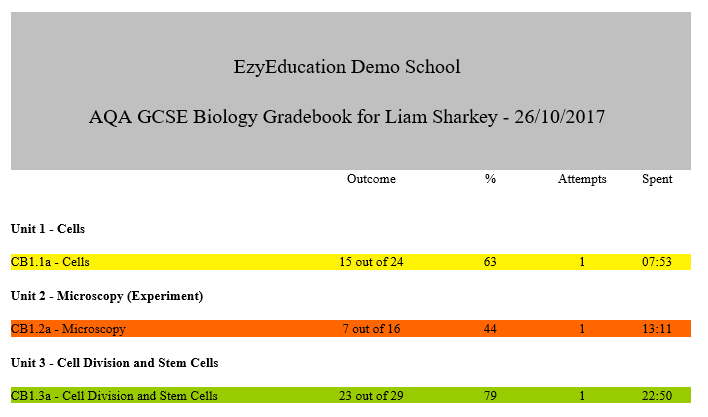
The difference between the ‘Bulk Gradebooks’ and the ‘Bulk Personal Reports’ is that the personal reports contain data about lecture videos as well.
Tracking
Tracking
From within a particular course, you can access Tracking via the right-hand side menu. This is your portal into the vast majority of our reporting data. The tracking page greets you with the latest course activities on the left-hand side, and links through to the most useful reports available on the right-hand side.
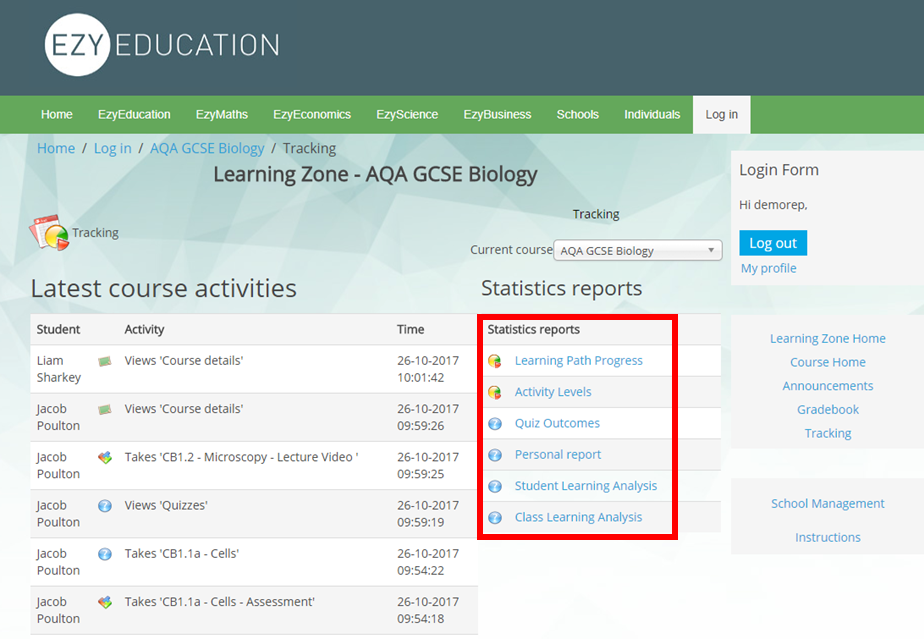
Learning Path Progress
Learning Path Progress
Learning Path Progress is a good way to determine who has, and who has not, completed a particular activity. We recommend using the filters at the top of the report to reduce the amount of data before opening up a particular lecture video or assessment.
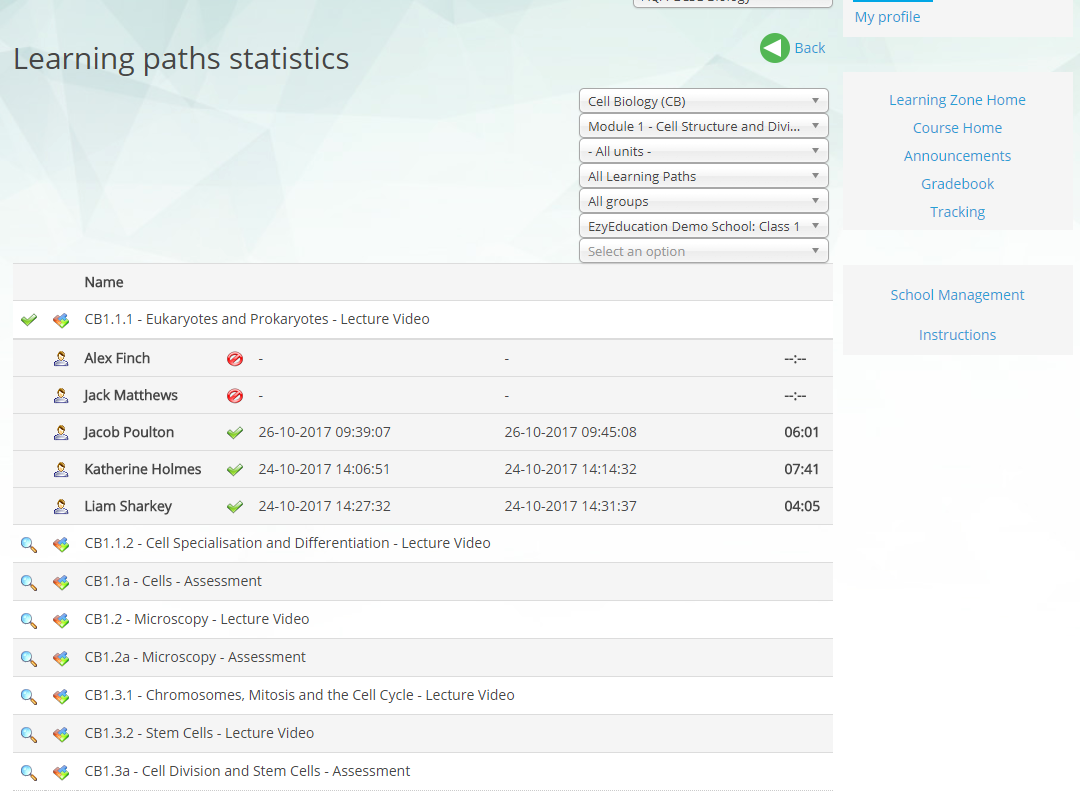
Clicking on the magnification glass will drop down the details for that activity, showing who has/hasn’t completed it, when and for how long.
Activity Levels
Activity Levels
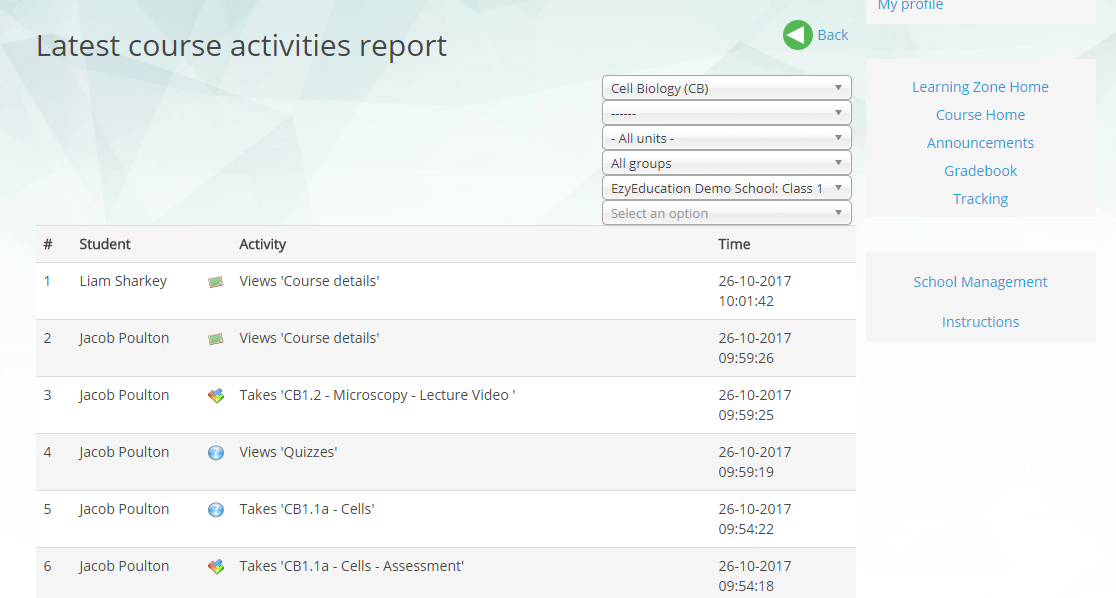
The Activity Levels report simply details all the actions that your students have taken on the platform, ordered with the most recent at the top. There are filters available at the top of the report to restrict the data to that which you are interested in.
Quiz Outcomes
Quiz Outcomes
The Quiz Outcomes report allows you to focus in on the assessment attempts your students have completed. There are filters available at the top of the report to restrict the data to a particular class, student, section, or assessment. If the student has finished their attempt, the Completed column will contain a ‘tick’. If a student has completed any assessment multiple times, you will be able to see the data for each individual attempt in this report.
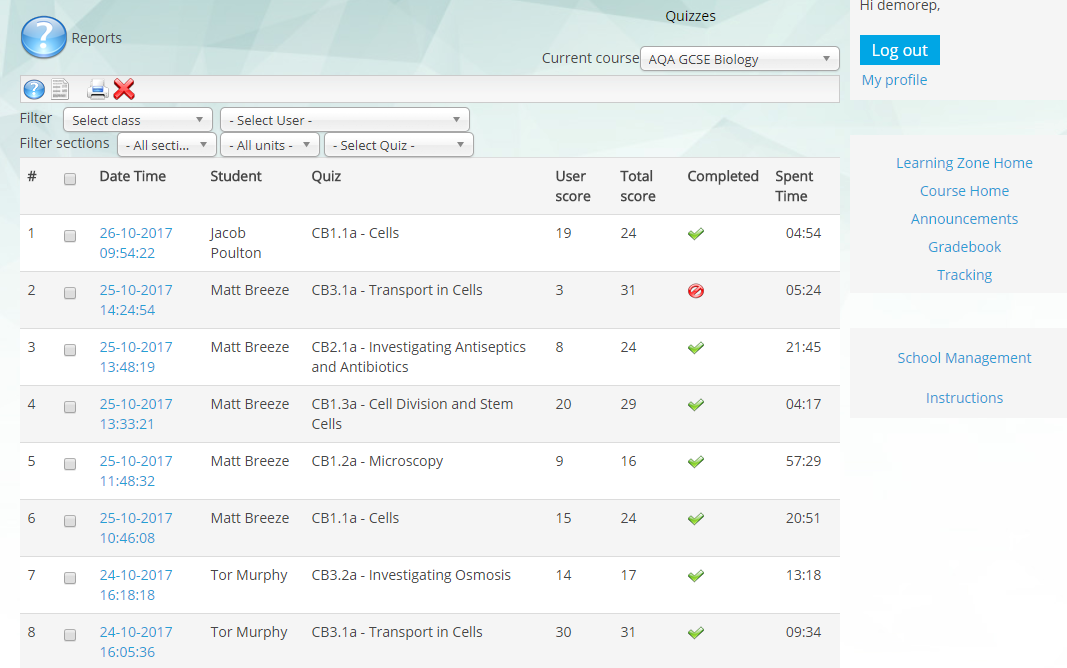
Clicking upon the time/date of the assessment will provide a question-by-question review of the attempt.
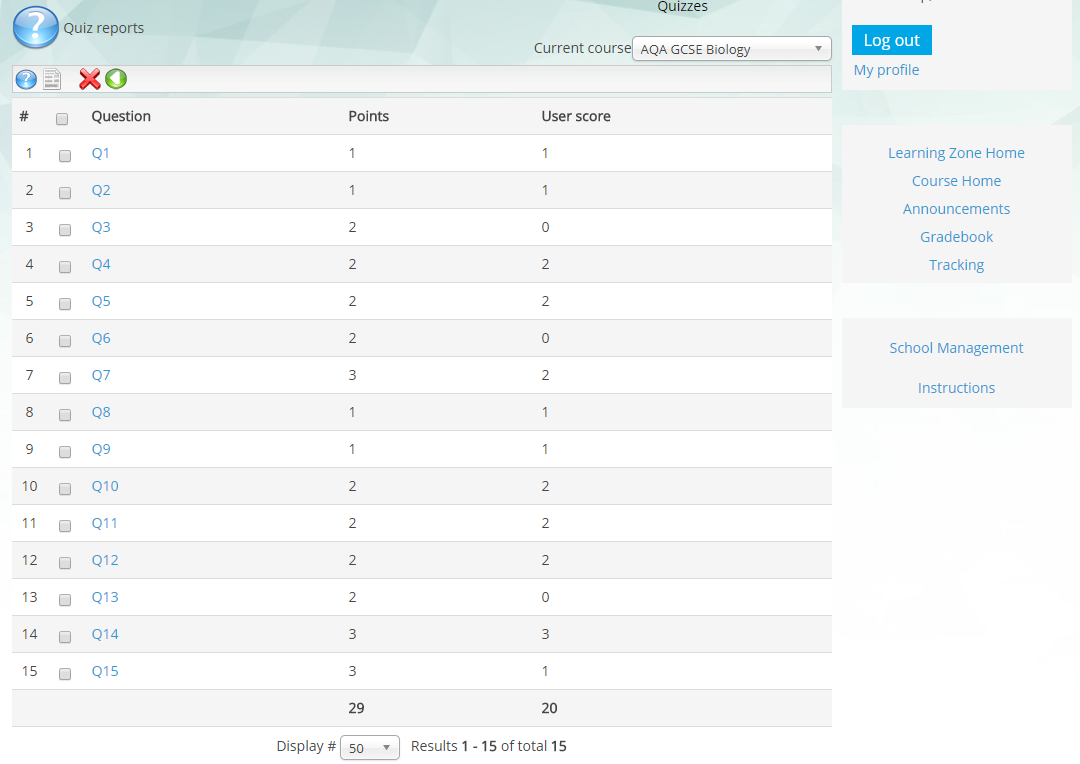
Clicking on a particular question will showcase the options selected by the student, the correct answers, and the feedback provided.
Student Learning Analysis
Student Learning Analysis
Student Learning Analysis is one of the most powerful reports available. Initially you will be asked to use the filter to select the section of the course you are interested in analysing.
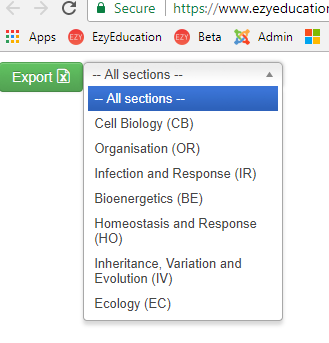
An assessment will then be selected, this can be changed using the filter. You can then filter to a class by using the ‘Select Class’ filter.
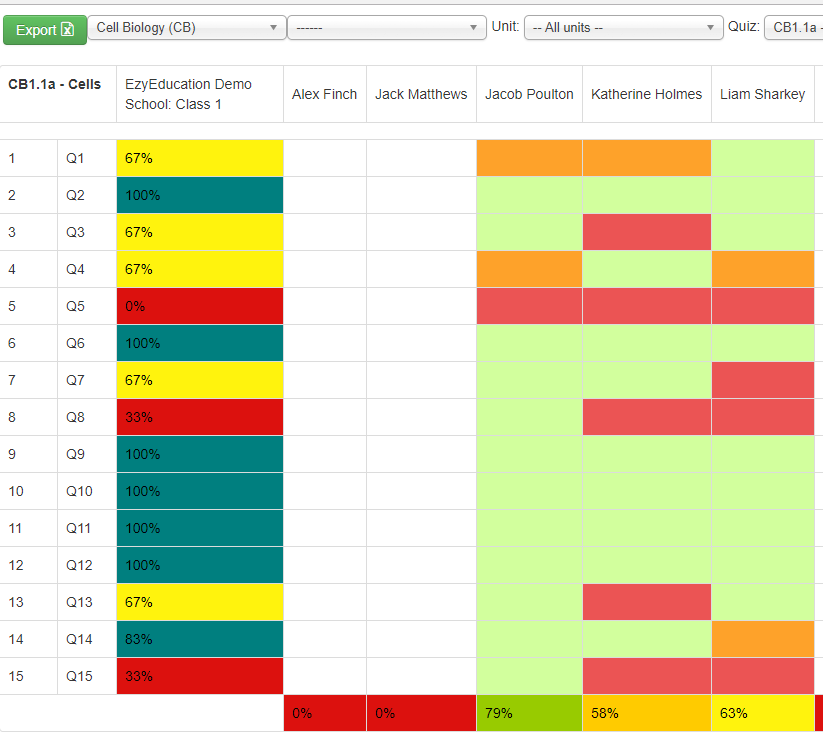
Class Learning Analysis
Class Learning Analysis
The Class Learning Analysis report follows a similar format to Student Learning Analysis, but allows you to compare question performance across classes. Again, you will be asked to select a section before any data is displayed.
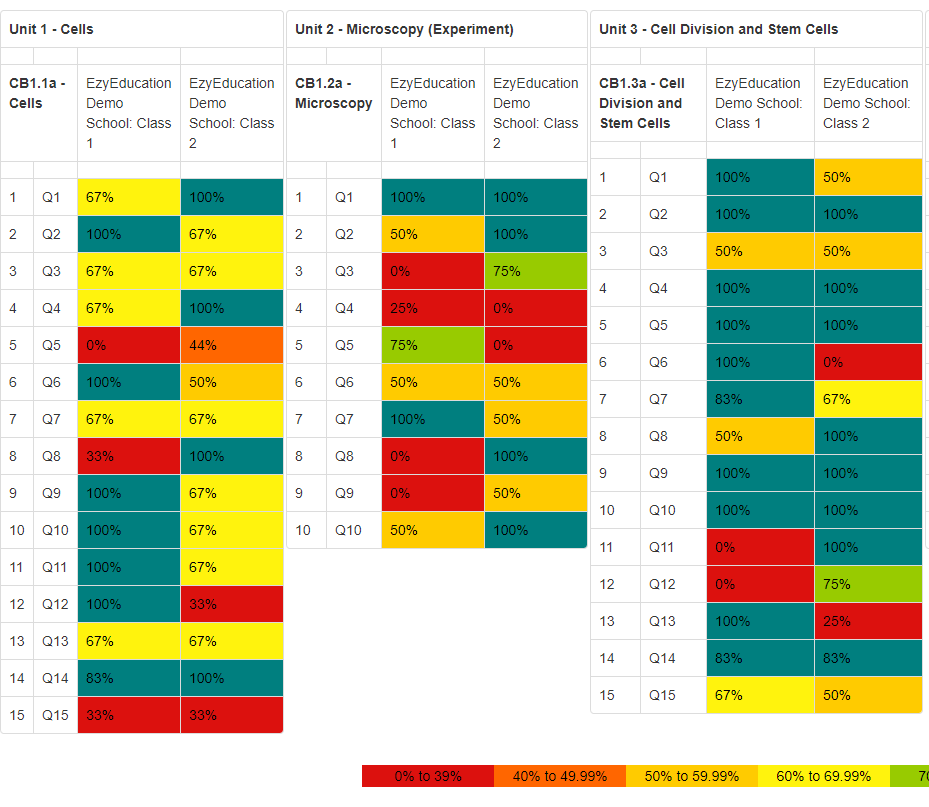
User Grades Report
User Grades Report
This report is accessed from learning zone home page. It is the only current report which allows you to view the assessment results across multiple courses in the same place.
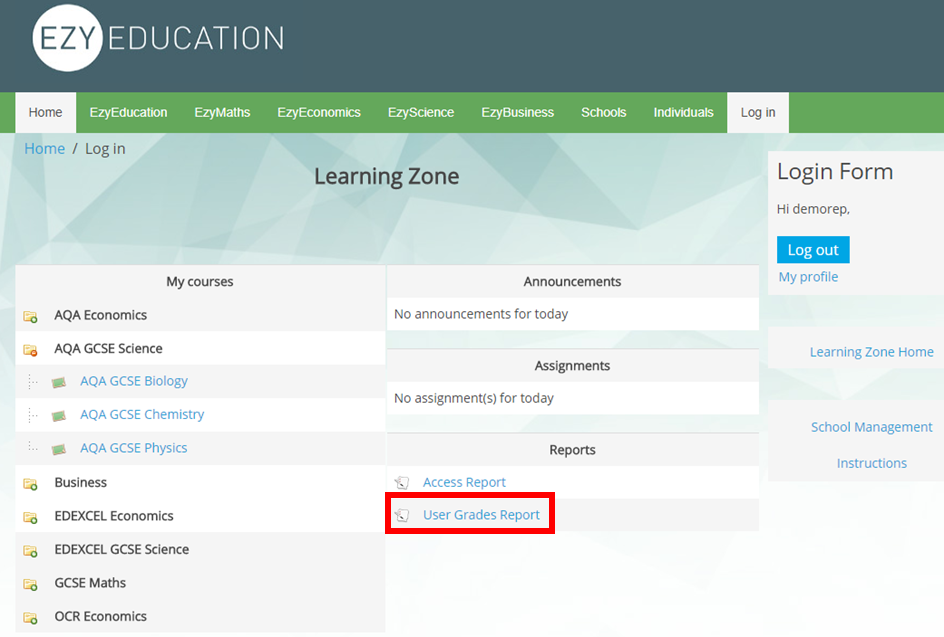
You need to select a particular user before the report will show any data.
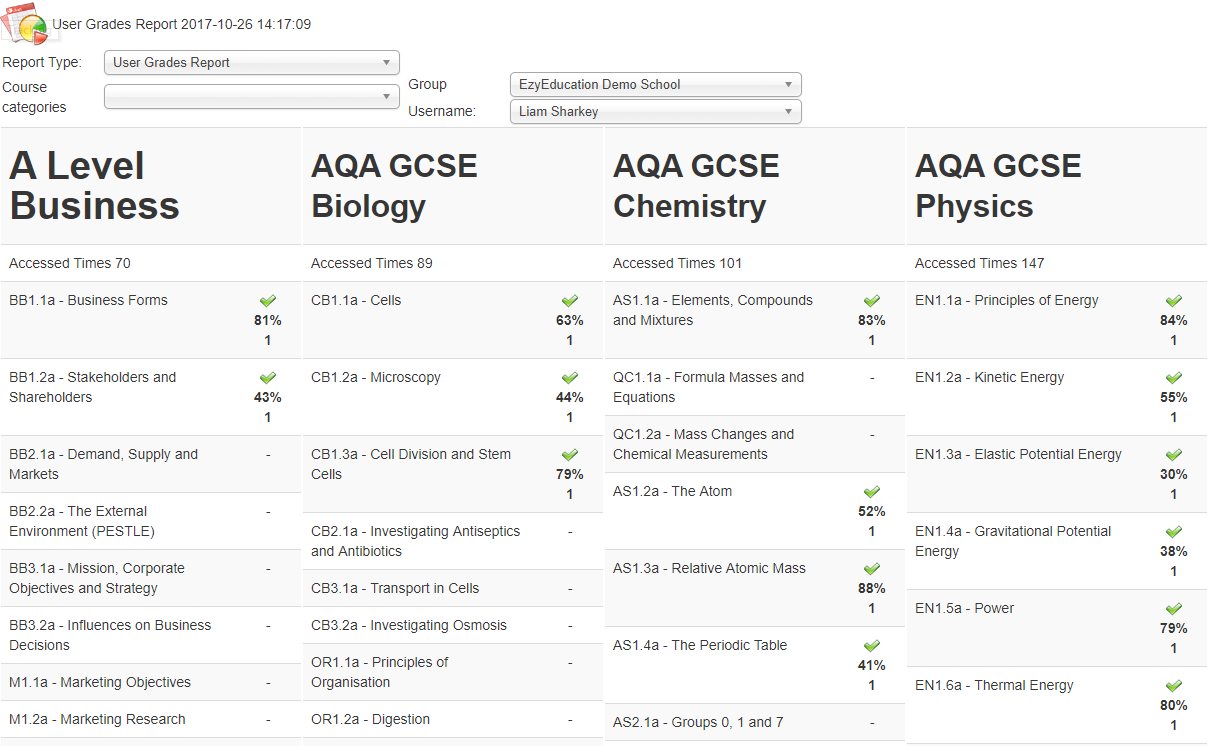
There is a download option to an excel spreadsheet at the very bottom of the webpage.
EzyEconomics – Course Specific Details
EzyEconomics – Course Specific Details
If you are using our EzyEconomics courses, your students will have access to End of Module Assessments (EMAs) for each module. These assessments contain 25 questions each and are intended to provide a comprehensive test of their understanding of that entire module. They are supposed to provide more of a summative assessment experience, in contrast to the formative experience provided by the unit assessments.
Our EzyEconomics courses also enjoy some additional features, found within the ‘Exam Zone’ at the bottom of the course home page.
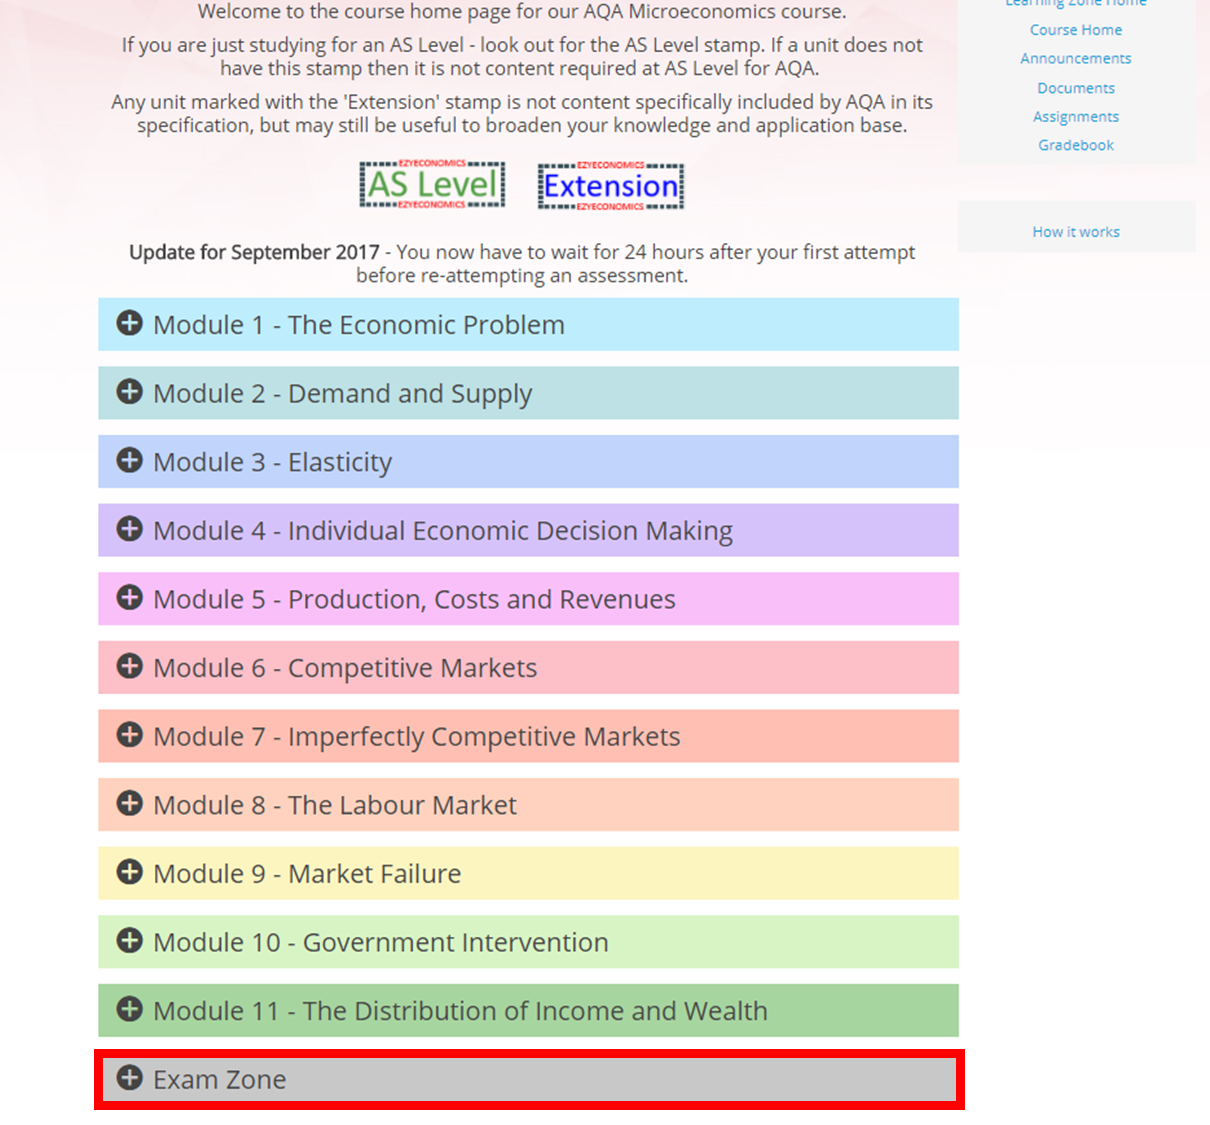
Our Year 12 Recap provides your students with short ‘snapshot’ revision videos designed to help them either prepare for AS exams, or recap material they are likely to have covered a while ago if they are revising for linear A Level exams. These are neatly encapsulated within micro and macro revision mindmaps, which allow your students to interactively move between topics. On each slide, if they want a little more explanation, they can hit the ‘Play’ button in the top-right to turn the ‘snapshot’ slide into a quick video explanation.

Please note that these revision mindmaps are one of the few EzyEducation resources which are flash-based. This means that they may not operate well on Apple devices. We are looking at ways to rectify this. Students can still access the recap videos in the exam zone without using the mindmap.
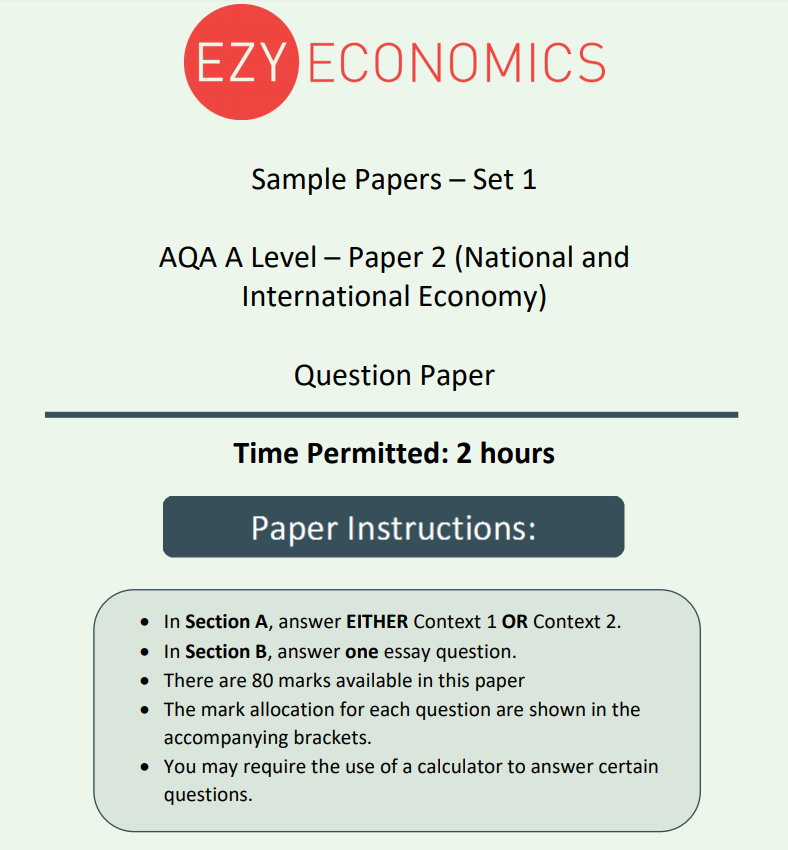
We have also produced some sample A Level exam papers for you to use as you see fit. Importantly, these come with comprehensive answer guides, which explain how students might go about effectively answering these questions. These answer guides are not freely available for students to access, in case you wanted to set our papers as a mock exam. You can contact us for access to them and distribute them as you see fit. You will find Paper 3 (the synoptic paper, which covers both Micro and Macro), in the Exam Zone in the Micro course.
EzyMaths – Course Specific Details
EzyMaths – Course Specific Details
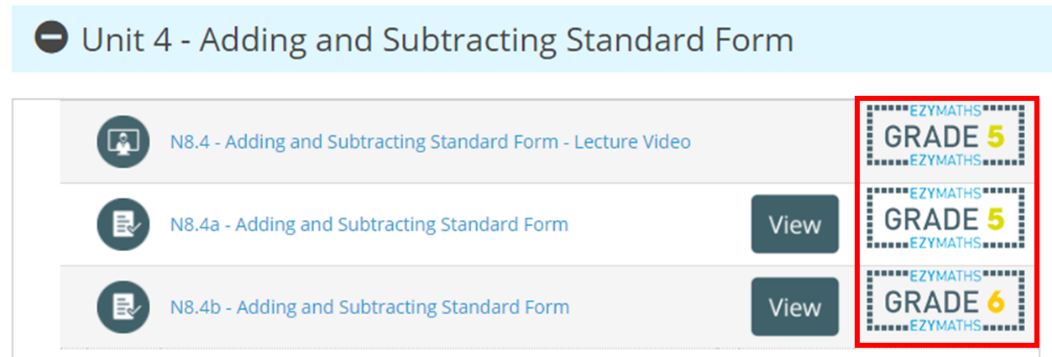
Each of our unit resources is labelled with a grade stamp. They provide an indication of the average challenge of that content. There may, of course, be variability of challenge within the resource.
Our EzyMaths course enjoys some additional features with a particular focus upon helping your students achieve in their exams. To find these, head to the ‘Exam Zone’ at the bottom of the course home page.
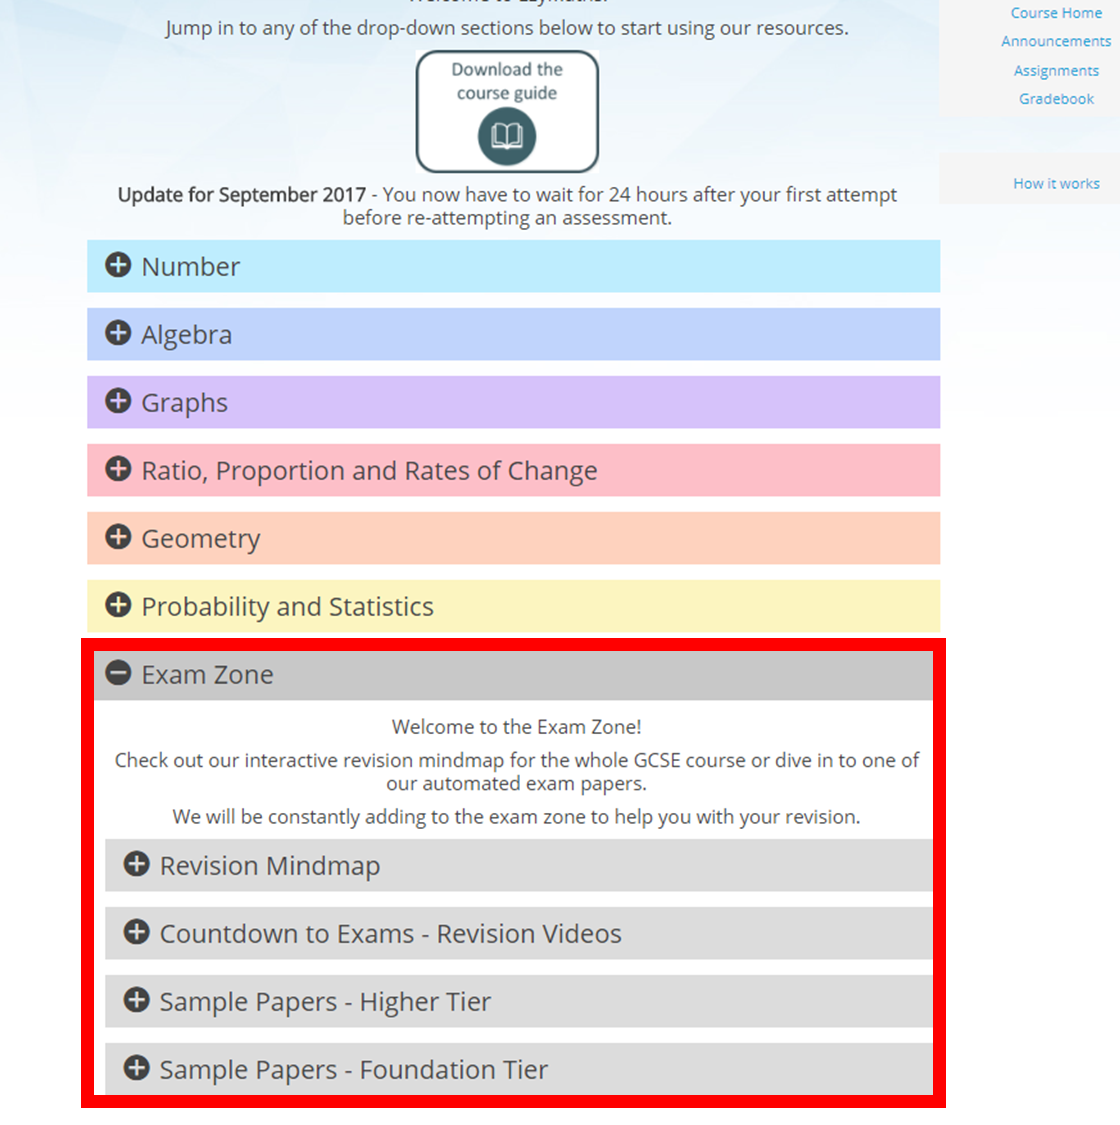
Our ‘Countdown to Exams’ series provides 85 short ‘snapshot’ revision videos, each covering a different topic. In the 12 weeks leading up to the GCSE exams, we encourage students to watch one-a-day as a quick way of covering all of the topics.
These are neatly encapsulated within our revision mindmap, which allows your students to interactively move between topics. On each slide, if they want a little more explanation, they can hit the ‘Play’ button in the top-right to turn the ‘snapshot’ slide into a quick video explanation.

Please note that these revision mindmaps are one of the few EzyEducation resources which are flash-based. This means that they may not operate well on Apple devices. We are looking at ways to rectify this. Students can still access the recap videos in the exam zone without using the mindmap.
We suggest having the revision mindmap open and available to refer to, when students are working through past papers (in open-book conditions). That way, if they are stuck on a question, but know which topic it refers to, they can easily pan to a reminder of the key processes and results of that topic.
EzyScience – Course Specific Details
EzyScience – Course Specific Details
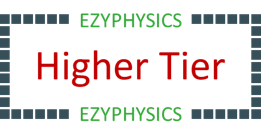
Resources which are not appropriate for foundation tier students are denoted with a ‘Higher Tier’ stamp.


Resources which are not appropriate for combined science students are denoted with one of the following stamps.

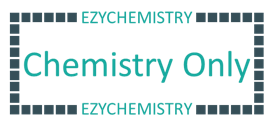
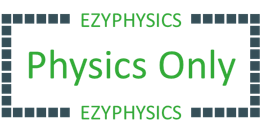
There is a large emphasis upon working scientifically, and mathematical skills are weaved throughout the resources found in our courses. In particular, these elements can be found within our coverage of the required practicals.
Resetting Passwords
Resetting Passwords
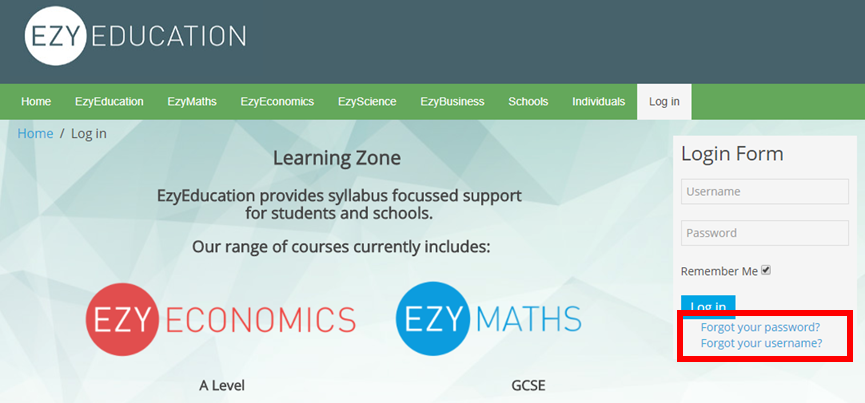
If your students are struggling to login, they should follow the ‘Forgot your password?’ routine in order to re-set their password, which is found underneath the Login Form.
Devices and Browsers
Devices and Browsers
The site is compatible with all devices, although for the best experience, we recommend not using a phone to try and complete assessments.
We recommend that you use the Google Chrome, Mozilla Firefox or Safari browsers.
Data Policy
Data Policy
You can view our comprehensive data policy. We take data security very seriously and a part of our data security strategy is the fact that we collect no personal student data other than names and email addresses. If you would like more information, please get in contact with us.
Terms and Conditions
Terms and Conditions
It is important to be aware that by using our site, you are bound by our terms of website use, which can be read here. You are also bound by our acceptable use policy, which can be read here.
Problems/Errors
Problems/Errors
We always check our content thoroughly, but with over 10,000 questions and videos coded on to the service, some things may always fall through the crack. We are grateful when users let us know if there is a problem with any of our resources, so we can put it right! Similarly, if you have any technical problems, please get in touch!
You can contact us by emailing This email address is being protected from spambots. You need JavaScript enabled to view it., or by using the live chat option found in the bottom-right hand corner of most of our webpages.
